Installation Steps
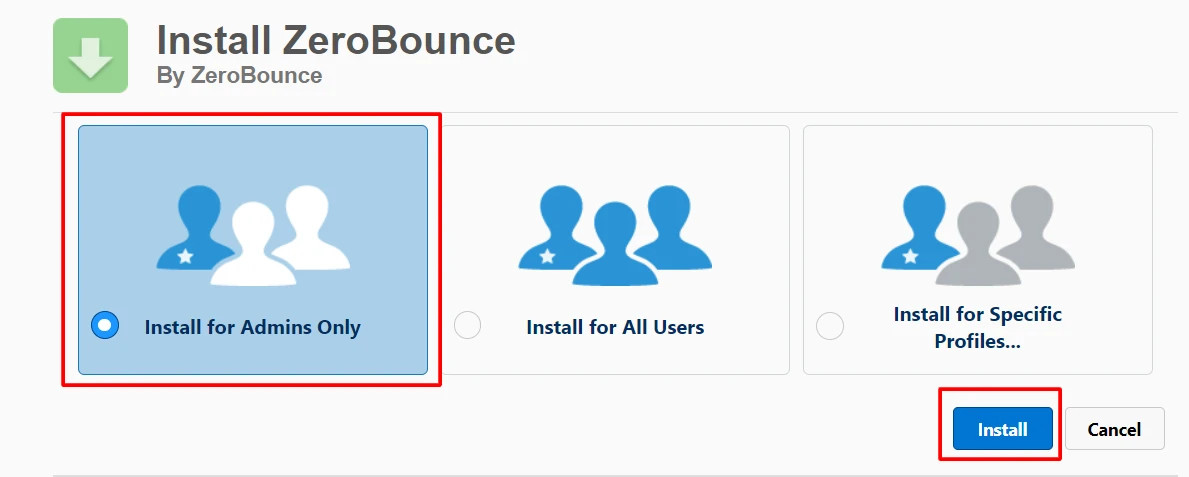
- Visit https://appexchange.salesforce.com/appxListingDetail?listingId=a0N4V00000IM29XUAT and install the package. Choose to Install for Admins Only.
- Note: If you already have an older version of the Salesforce Integration installed you can follow these steps to upgrade your version. Your already validated contacts and leads will not be impacted.
- On the next popup, tick the box to grant access and click Continue. This allows access to ZeroBounce APIs. After this, the package will start the installation process which may take a while.
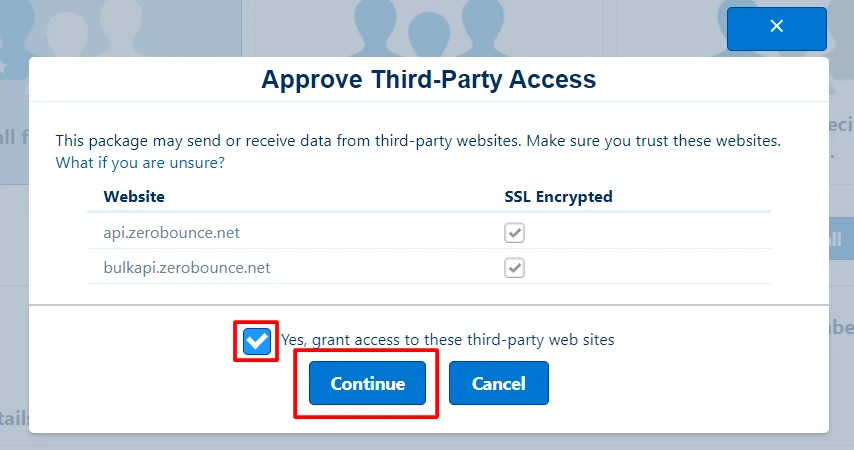
- Note: The package includes a post installation script. Only the admin has permissions to run this script, therefore it is required to install the package for admins only.
- After the package has been installed click on the AppExchange logo (9 dots beside setup) and search for ZeroBounce

- Click on the ZeroBounce App. You will be redirected to the ZeroBounce App page
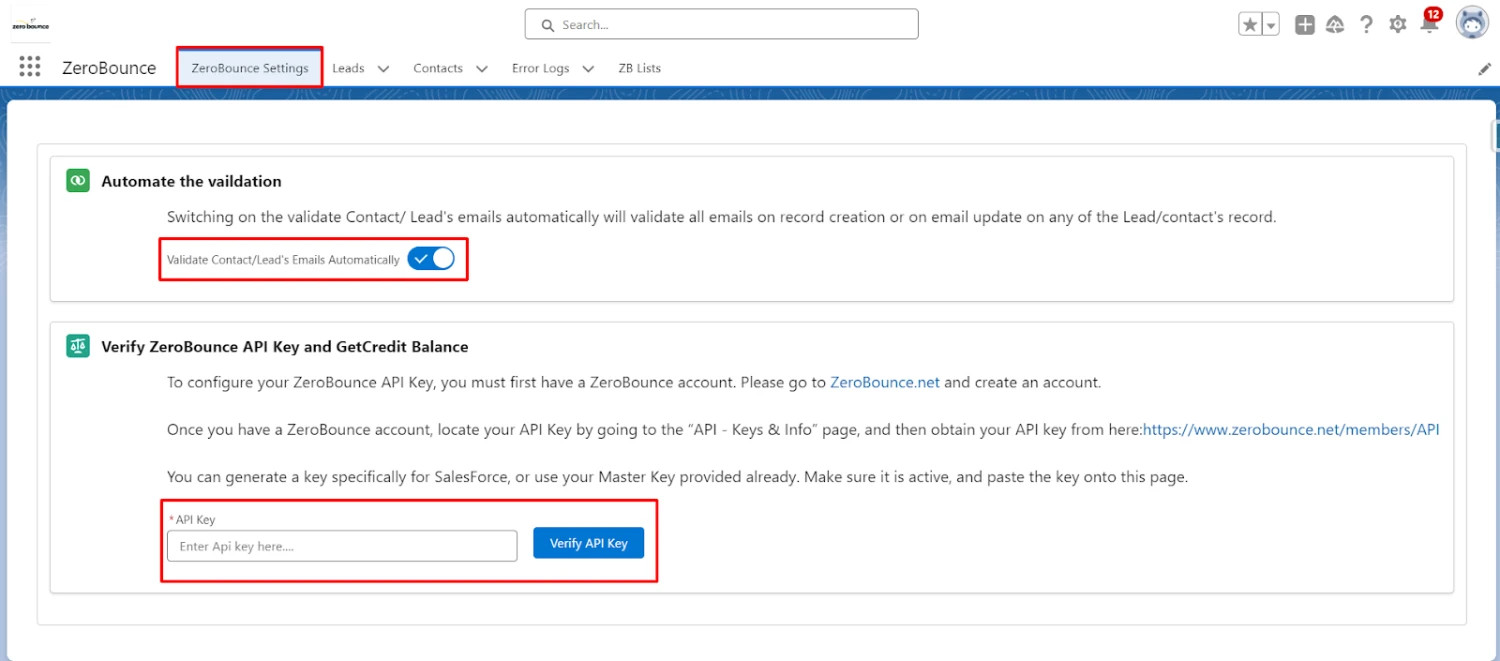
- Choose your automatic validation setting. If this is active, any new contact and lead will be automatically validated
- Below, you are required to enter your ZeroBounce API Key which you can get from https://www.zerobounce.net/members/API

User Guide
Once the package is installed successfully and your API key verified, follow the below steps to validate the emails of your Contacts and Leads.
Note: If you have upgraded from an older version, make sure you only validate contacts and leads through the ZB Lists Tab as validating them from the Contacts/Leads tab is not supported anymore.
First go to the ZB Lists tab. The screen consist of three tabs
- Create List View
- Search Existing List View
- Schedule Batch For List View
- Delete List View
- This tab is useful for creating List Views
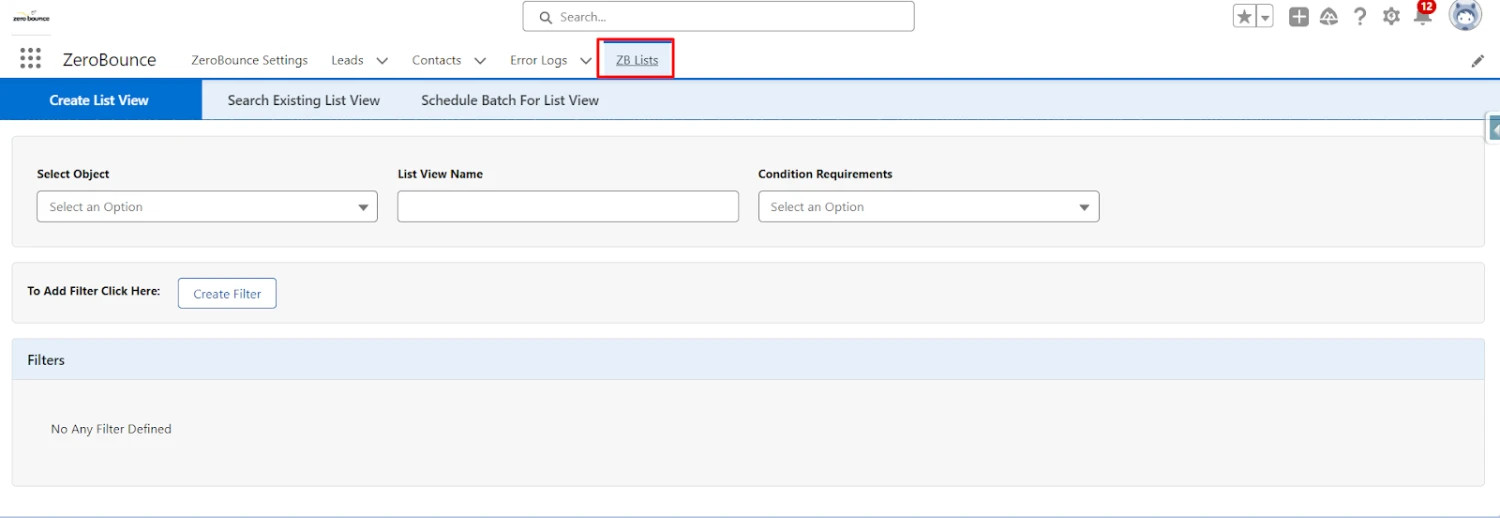
- From the first drop down select the object (either Lead or Contact) from options.
- In the second field give a unique list view name. From the third drop down select the condition which will be used in the filters. The options available are:
- All: Select this option to retrieve all records of the chosen object, including emails, without specifying any filters.
- AND: Use this option to establish an AND condition between successive filter definitions.
- OR: Utilize this option to set an OR condition between consecutive filter definitions.
- Custom Logic: Choose this option to define custom logic between consecutive filter definitions, such as (1 OR (2 AND 3)).

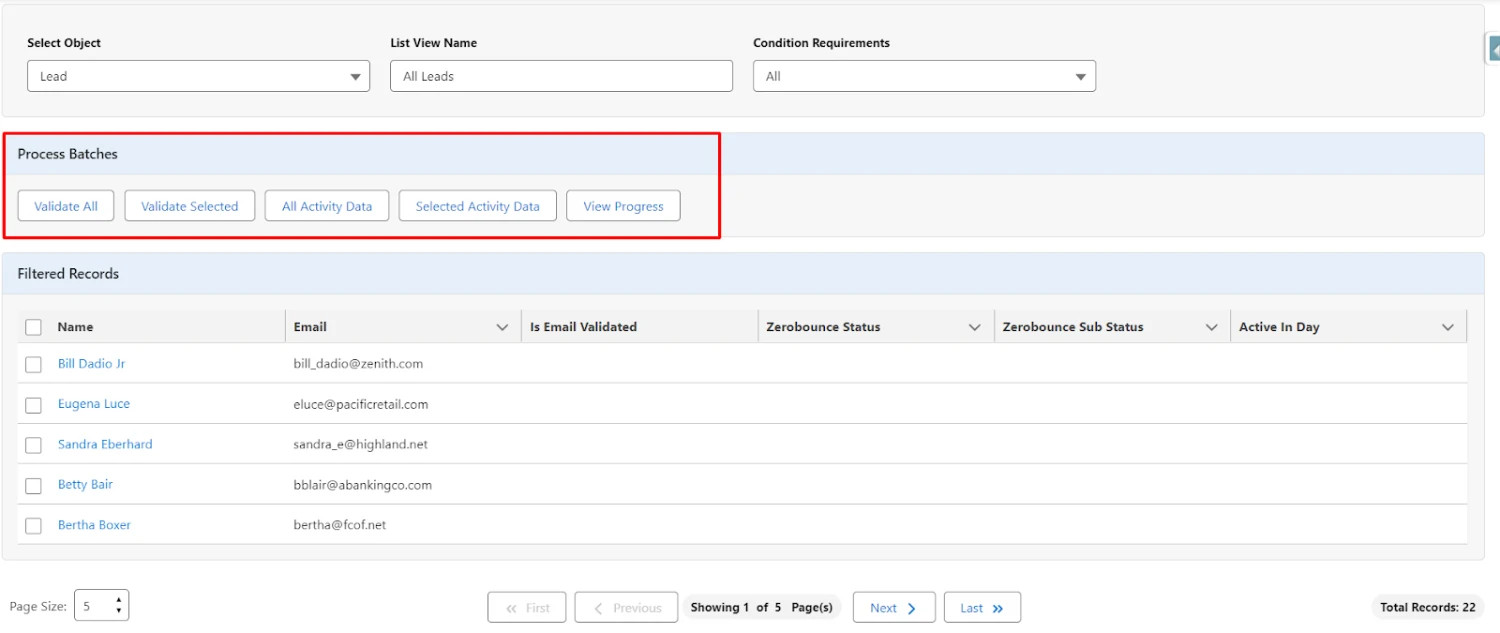
A. If you select All from the third dropdown labeled Condition Requirements, you will get the below screen
- When you click the save button, it will retrieve all records of the selected object, including emails, and generate a list view with the name you specified in the field labeled "List View Name." You can view the fetched records in the data table, where validation options are available to process batches as follows:
B. If you selected "AND" or "OR" from the third dropdown
- If you select "AND" or "OR" from the third dropdown menu, it indicates that you intend to define a filter by clicking the "Create Filter" button.

- In the provided image, I selected "OR" from the third dropdown labeled "Condition Requirements" and clicked on the "Create Filter" button. Upon clicking the "Create Filter" button, it opens the following options:
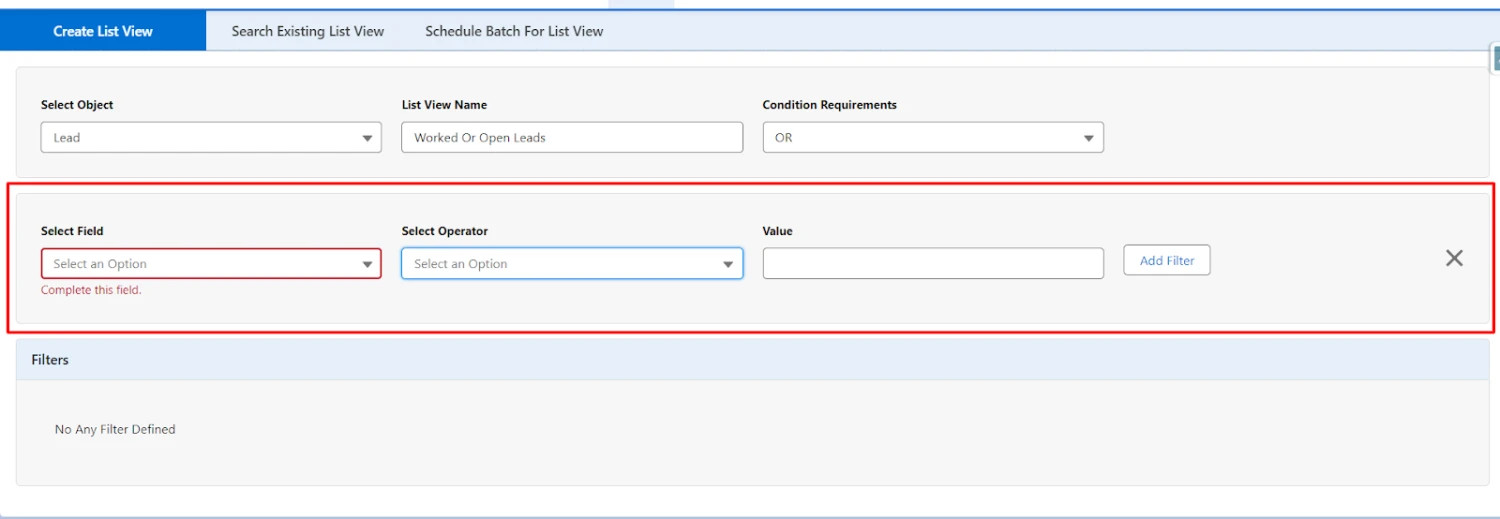
- The first dropdown, labeled "Select Field", provides options to choose fields from the selected object.
- The second dropdown, labeled "Select Operator" allows you to choose an operator (such as Equal, Not Equal to, Contains, etc.) based on the field selected in the first dropdown.
- The third field, labeled "Value", adjusts dynamically based on the field selected in the first dropdown.
- For instance, if you select a field from the first dropdown that is a dropdown type from the record page, it will display all the dropdown values as shown below.

- To cancel creating a filter, simply click on the cancel icon.
- To add a filter, select the value you want to filter and click on the "Add Filter" button. This action will create a filter as illustrated below.

- As depicted, it appears with "OR" which we already selected from the "Condition Requirements" dropdown.
- You can delete this filter by clicking on the delete icon, which will appear with each filter.
- To create another filter, click again on the "Create Filter" button. It will look as shown below.

- Now, you can click on the "Filter Records" button to fetch the records of the selected object.
- In this scenario, it will retrieve all the records of Leads with the status "Open -- Not Contacted" or "Working -- Contacted" by clicking on the "Filter Records" button.
- You can view these records in the data table as shown below, and a list view will be created with the name you defined in the field labeled "List View Name."
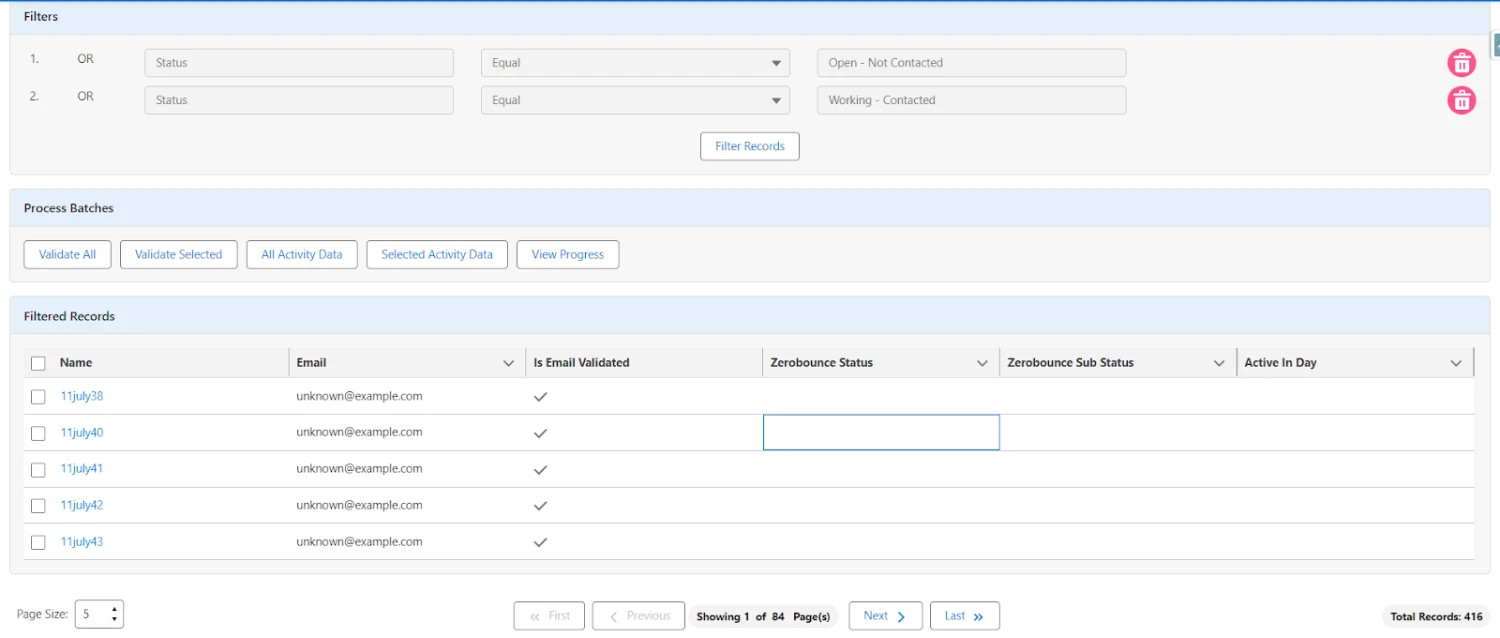
- Once again, it will open the options to process the batch on the records displayed in the data table.
- You can fetch the records of the selected object by defining additional filters as needed.
- The procedure remains the same if you choose "AND" from the "Condition Requirement" dropdown. Additionally, you can change the "Condition Requirement" from "OR" to "AND" or "Custom Logic" and vice versa during the process.
C. If you selected Custom Logic from the Condition Requirements dropdown
- If you select "Custom Logic" from the dropdown, an additional field labeled "Write Custom Logic" will appear on the screen beside the "Condition Requirement" dropdown.
- If filters are not already defined, this field will be disabled.

- The "Write Custom Logic" field will become enabled once you have defined at least one filter. This feature is designed to facilitate fetching records of the selected object based on complex logic requirements, such as (1 OR (2 AND 3)).
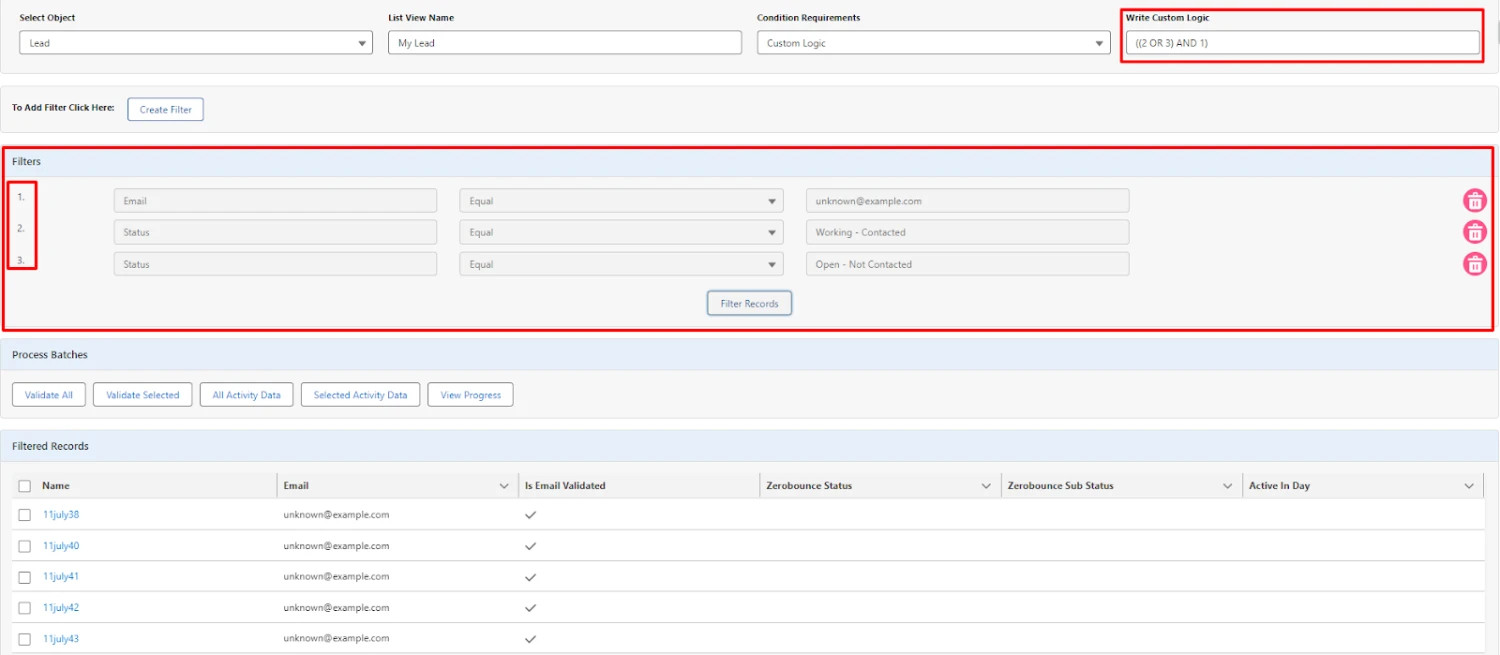
- In the above screen, we filtered records by clicking on the "Filter Records" button with the custom logic ((2 OR 3) AND 1), where the digits in the logic correspond to the highlighted part of the "Filters" section.
- We will receive records in the data table with the following logic: The leads whose status is "Working -- Completed" or "Open -- Not Completed" and whose email is "unknown@example.com".
Functionality to validate email:
As you will get records from defined filter or by choosing All value from Condition Requirements dropdown, you can validate emails by following the below steps
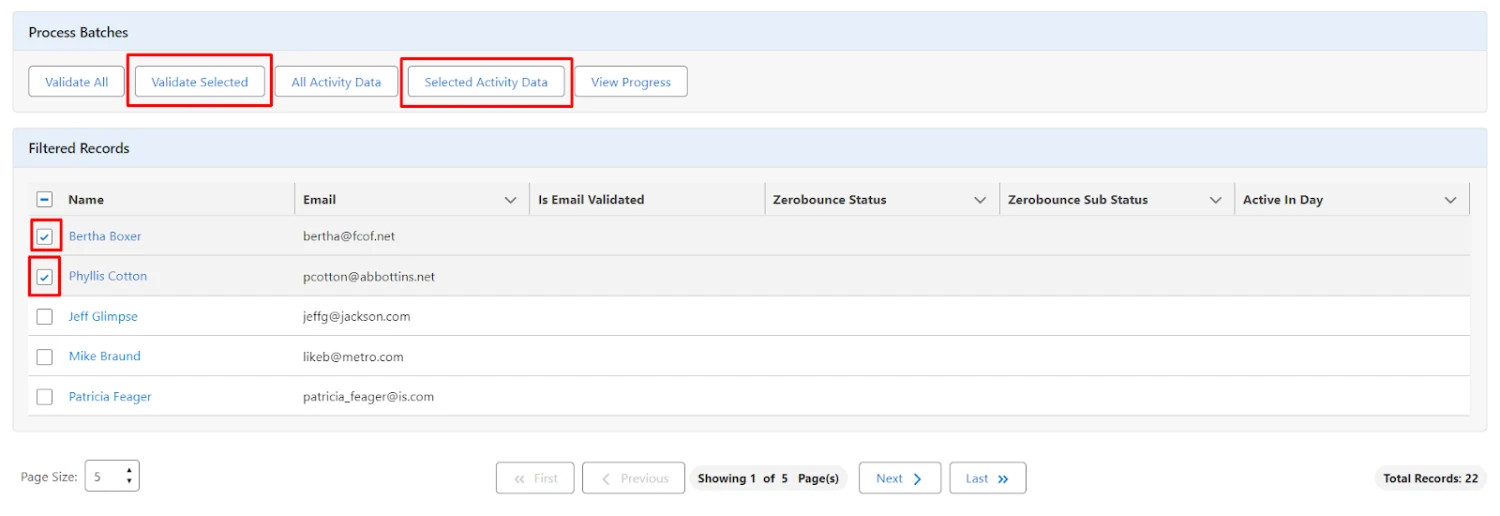
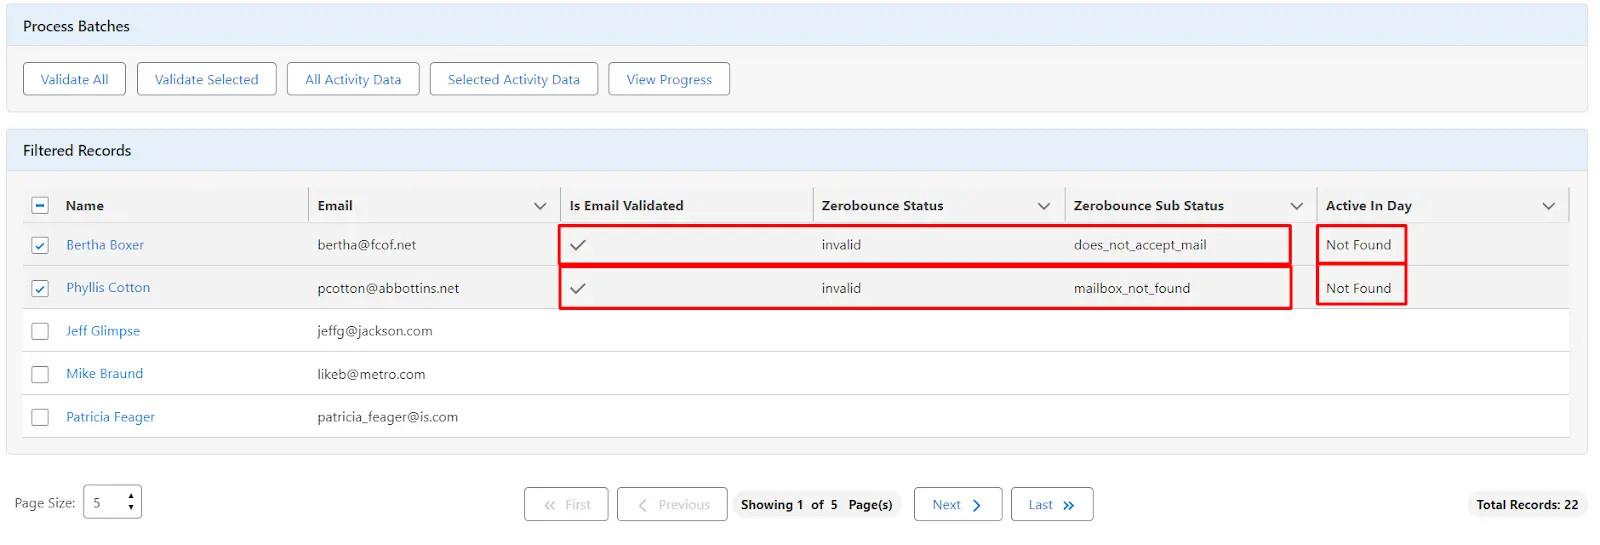
a) Validate Selected and Selected Activity Data button
- Users can now validate emails by selecting records and clicking on the "Validate Selected" button. Additionally, they can retrieve activity data by clicking on the "Selected Activity Data" button for the chosen records.
b) Validate All button
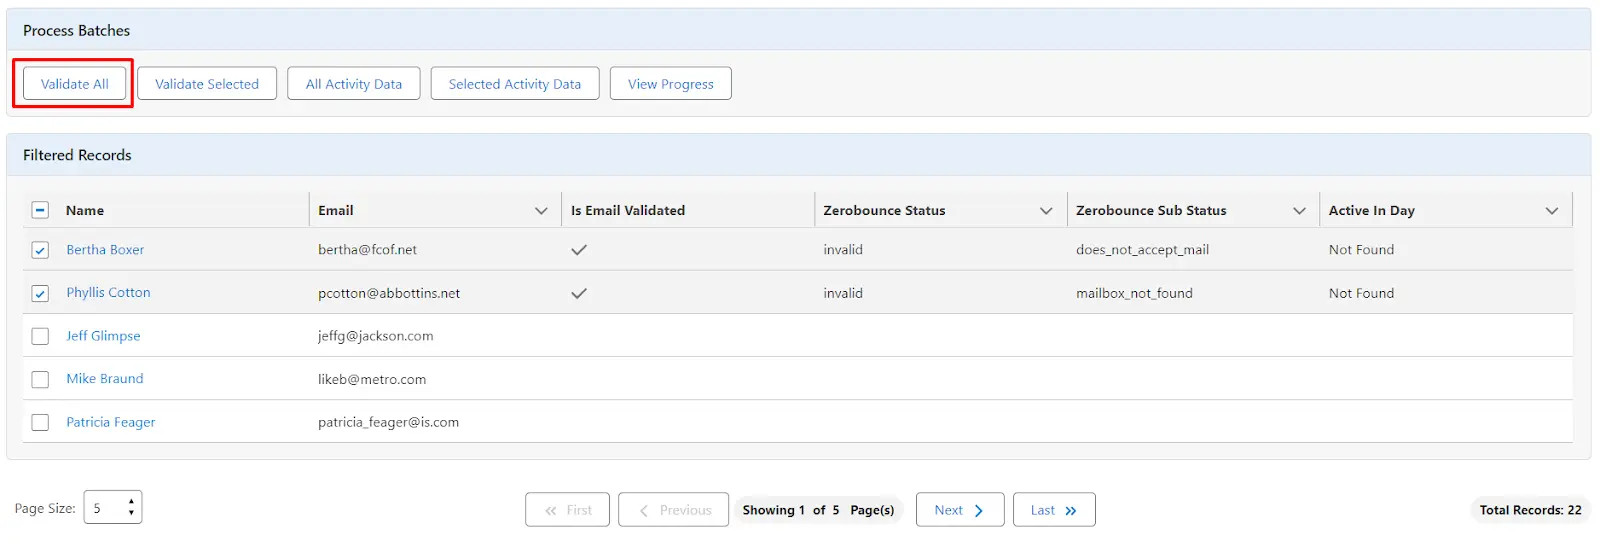
- To validate all emails from the data table, click on Validate All button
c) View Progress button
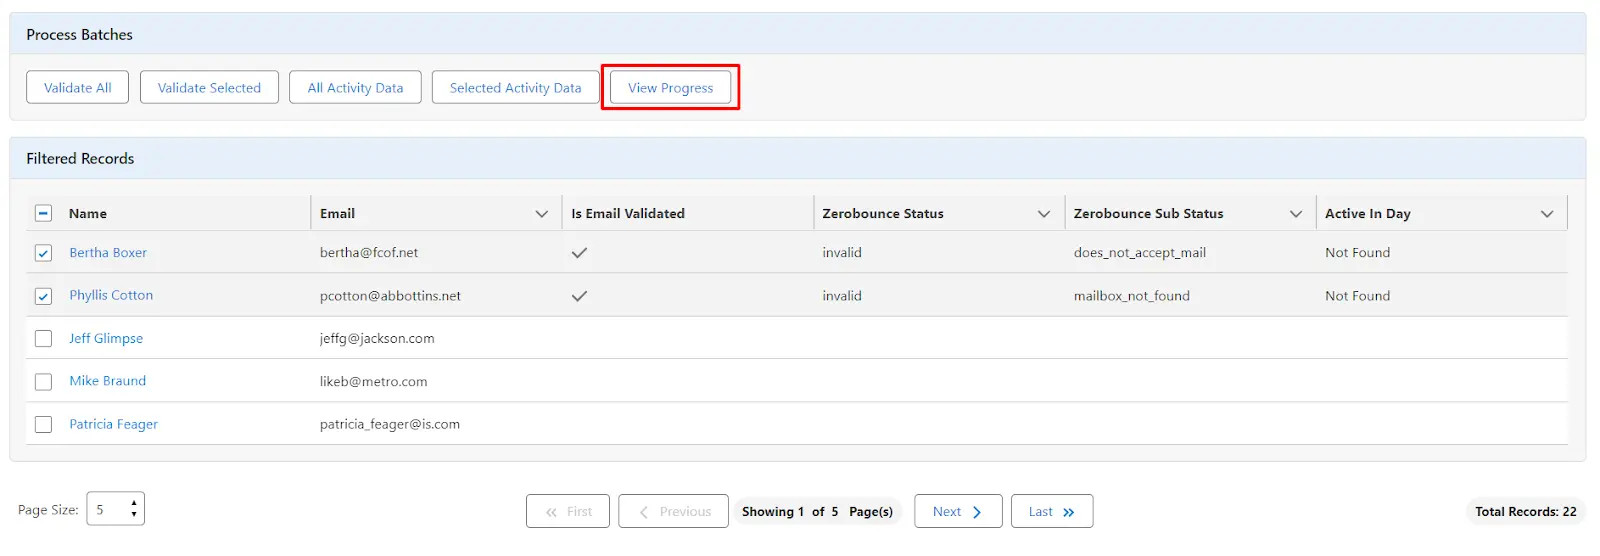
- To see the progress of Validate All batch click on View Progress button
- You will see the following popup:
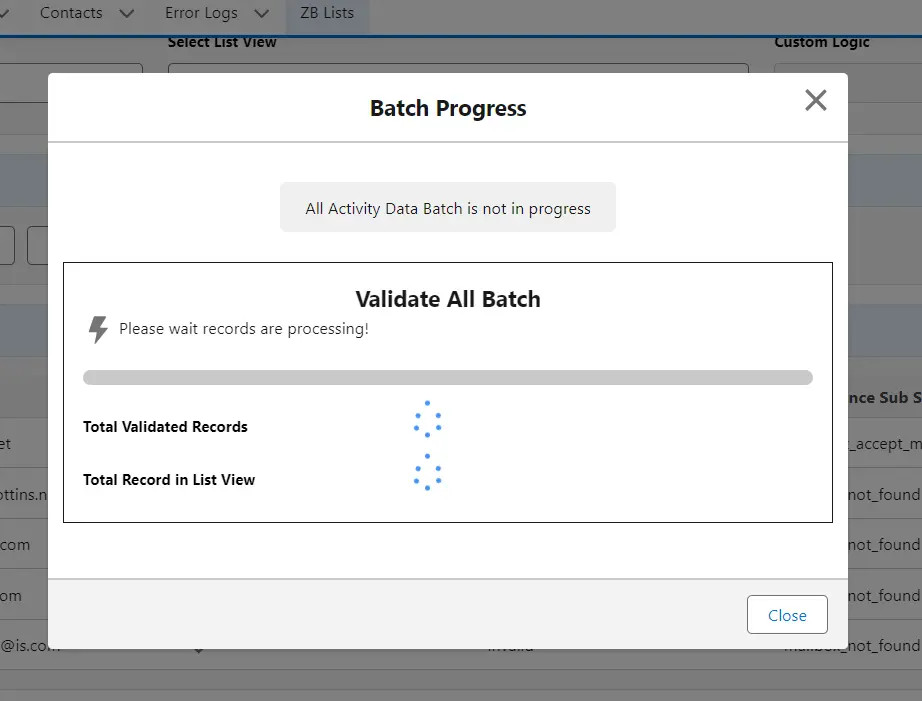
- As depicted, the popup indicates that the "All Activity Data" batch is not in progress, thus providing a notification.
- To close the popup, you can either click on the cancel icon or the "Close" button.
- After validating all emails, you can track the progress within the same popup.
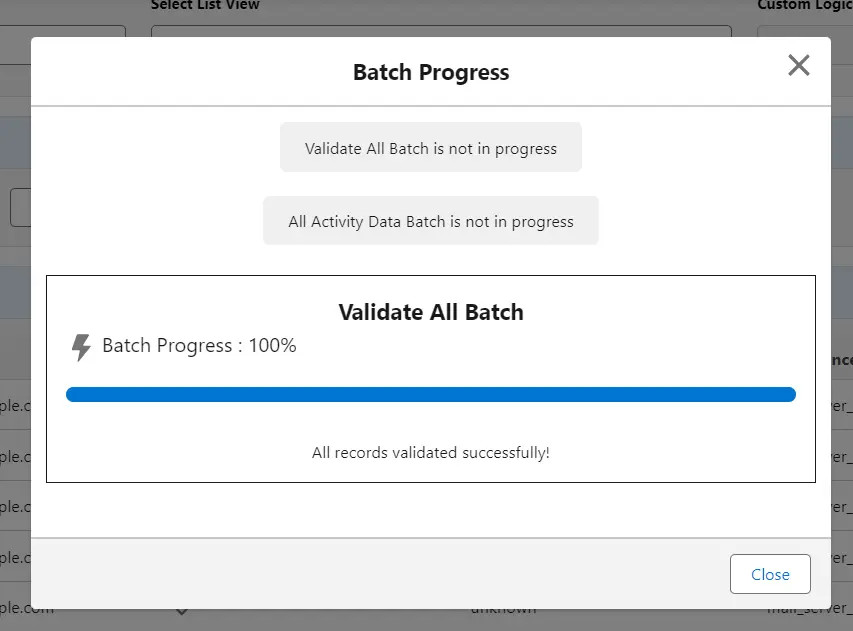
- Once the progress reaches 100%, all emails will be successfully validated. At this point, you will receive an email confirming that the Batch Validation has been completed. The email will include the name of the user who performed the validation and the name of the List View on which the validation was performed.
- Now, you can observe that all emails from the data table are ready to be validated.
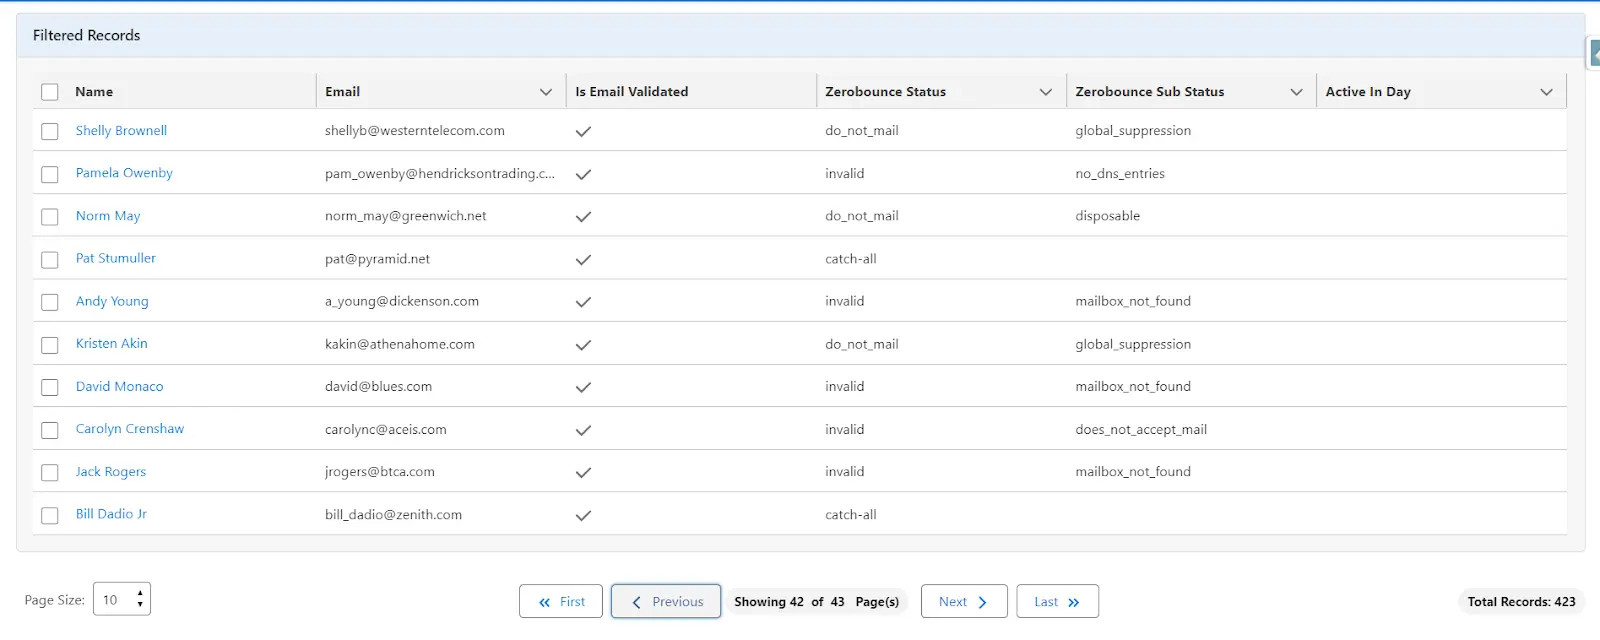
d) All Activity Data button
- To obtain activity data for all emails listed in the data table, simply click on the "All Activity Data" button.
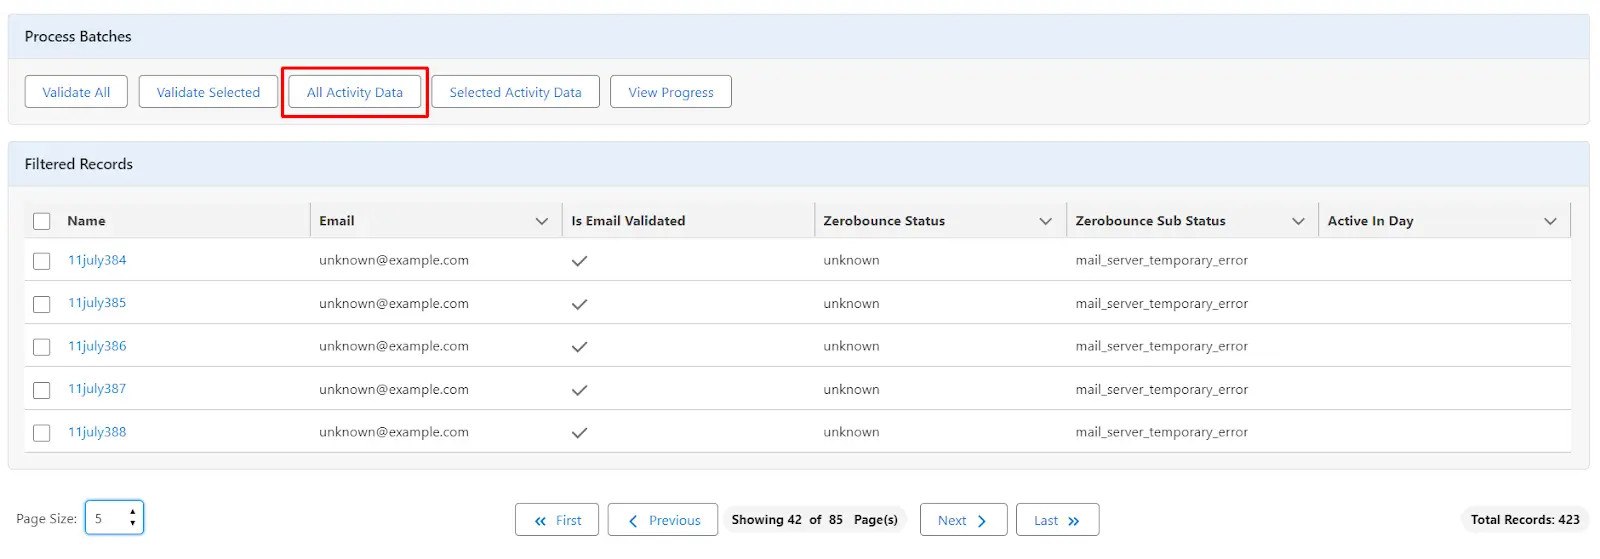
- To monitor the progress of the batch, click on the "View Progress" button. This action will display the following popup.
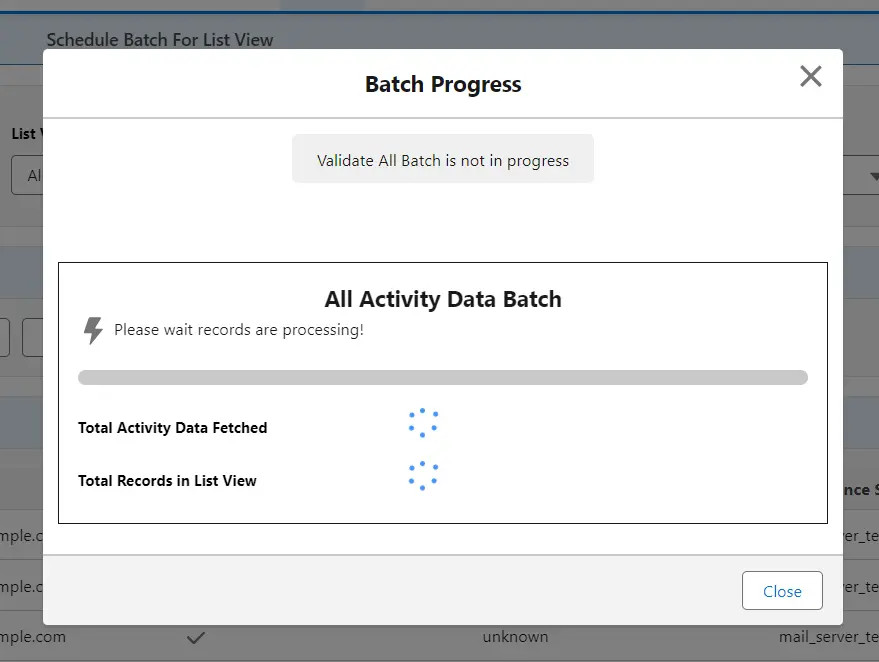
- As indicated, the notification states that the "Validate All" batch is not in progress, as only the "All Activity Data" batch is currently processing.
- Once all records have been validated, you will be able to view the progress within the same popup.
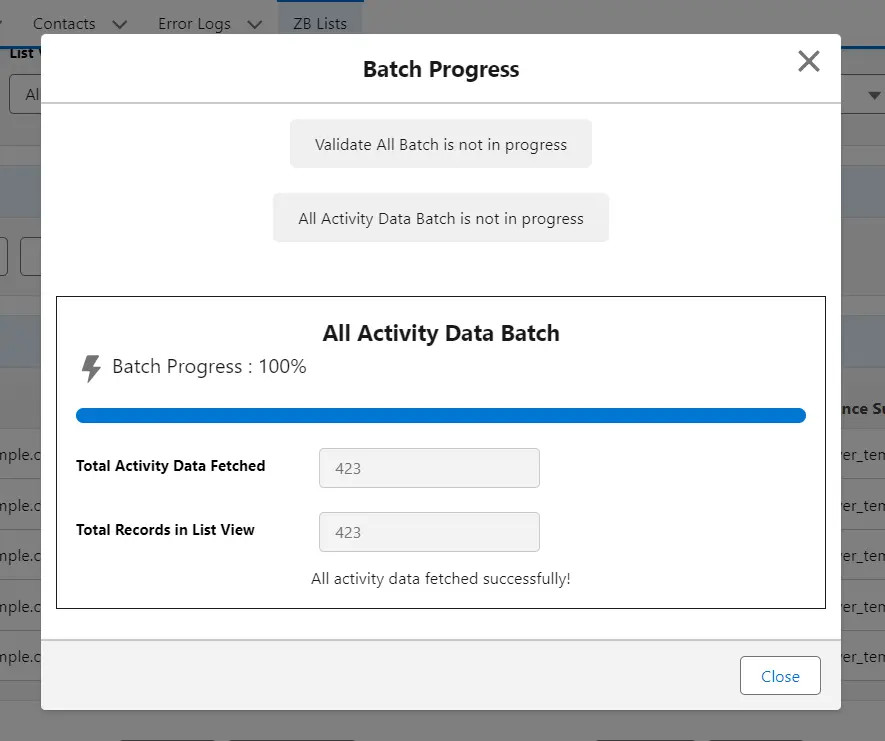
- Once the progress reaches 100% for both the "Validate All" and "All Activity Data" batches, all emails will be successfully validated. You will receive an email confirming that the Batch Validation has been completed. The email will include the name of the user who performed the validation and the name of the List View on which the validation was performed.
- You can monitor the progress of both the "Validate All" and "All Activity Data" batches simultaneously if you started both batches on the same list view.
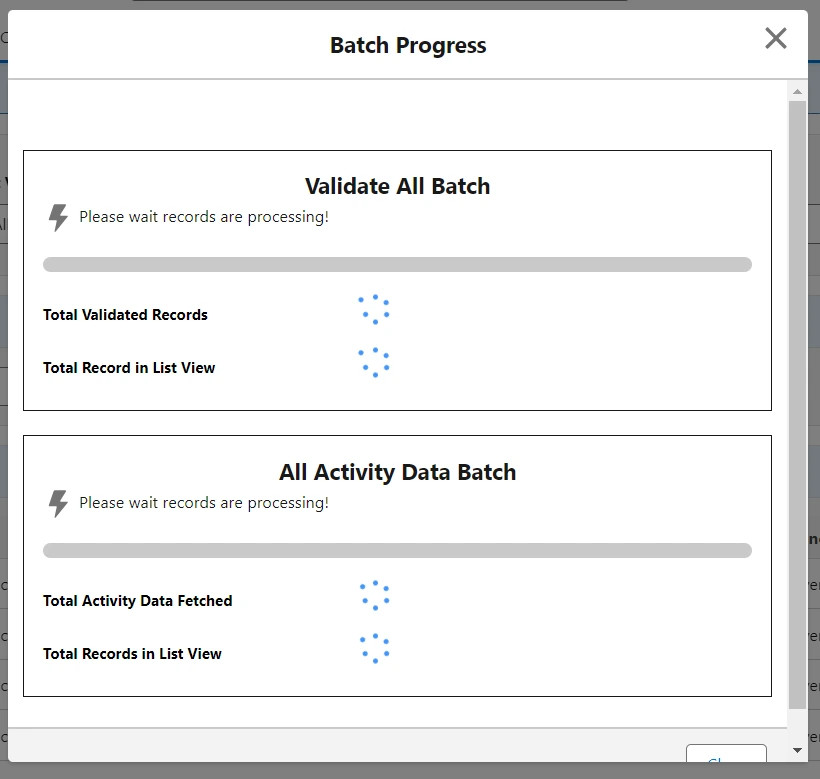
- Search Existing List View
- This tab is provided to search existing list views on Contacts and Leads.
- As you click on this tab, the screen looks as following

- Initially, the interface contains two dropdowns labeled "Select Object" and "Search List View."
- From the first dropdown, you must choose an object from the options "Lead" or "Contact." Only after selecting an object from the first dropdown will the second dropdown appear.
- The second dropdown will display all the names of the list views that you created for the selected object from the "Create List View" tab.

- When "Lead" is selected from the first dropdown, the second dropdown will display three list view names that were created for the Lead object in the "Create List View" tab (e.g., "All Leads," "My Leads," "Working or Open Leads").
- Upon choosing any list view name from the dropdown, a third field will appear beside the "Select List View" dropdown. In this field, you will see the option you selected from "Condition Requirements" while creating the selected list view (e.g., "All," "OR," "AND").
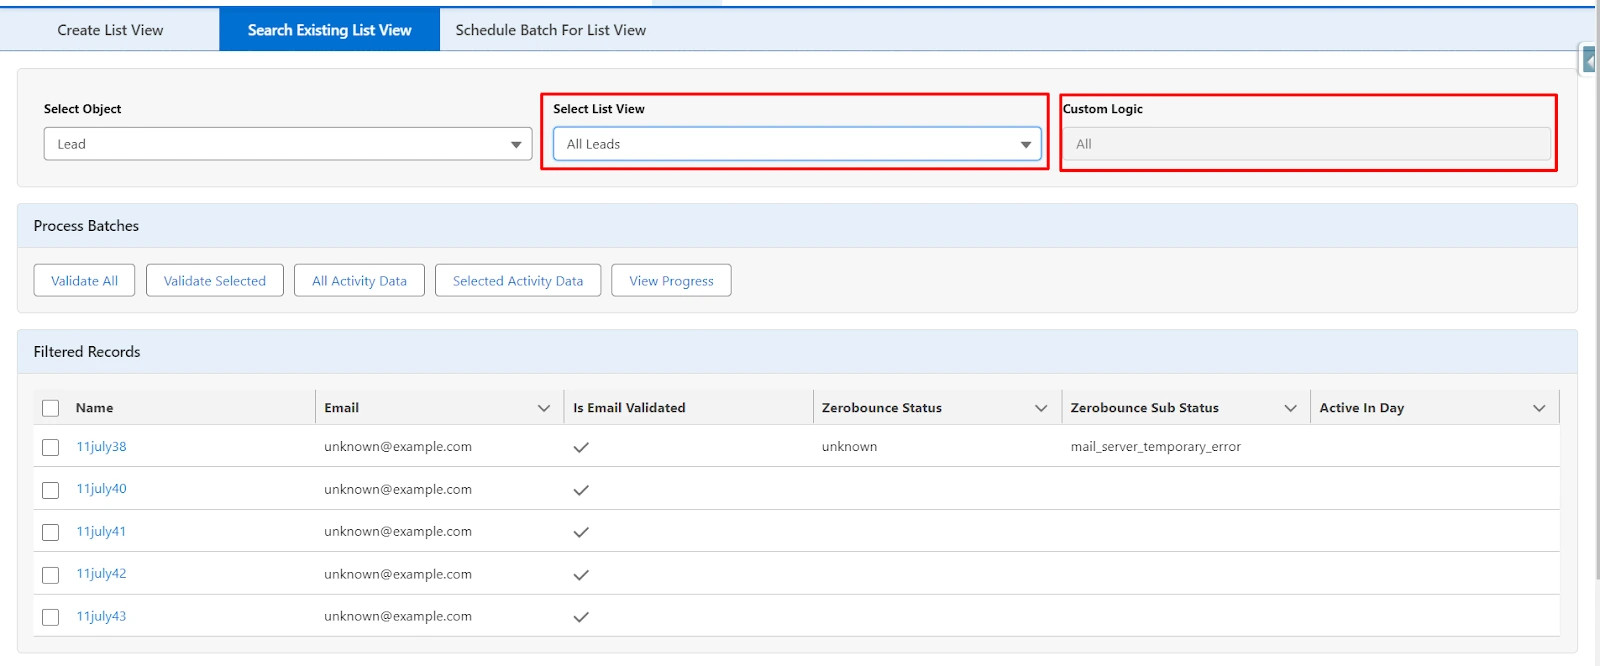
- For the Lead object, if you have created a list view named "All Leads" with the logic "All," it will display all the records of leads, including emails.
- Now, if you select another list view from the "Select List View" dropdown, the interface will update accordingly.

- In the scenario where the "Working or Open Leads" list view is selected, the defined filters for this list view are displayed in a separate section. The third field is populated with "OR," indicating that the "Working or Open Leads" list view for leads includes filters shown in the separate section, and the logic between consecutive filters is "OR."
- By clicking on "See Filtered Records," you can obtain the records according to the defined filters as illustrated below.
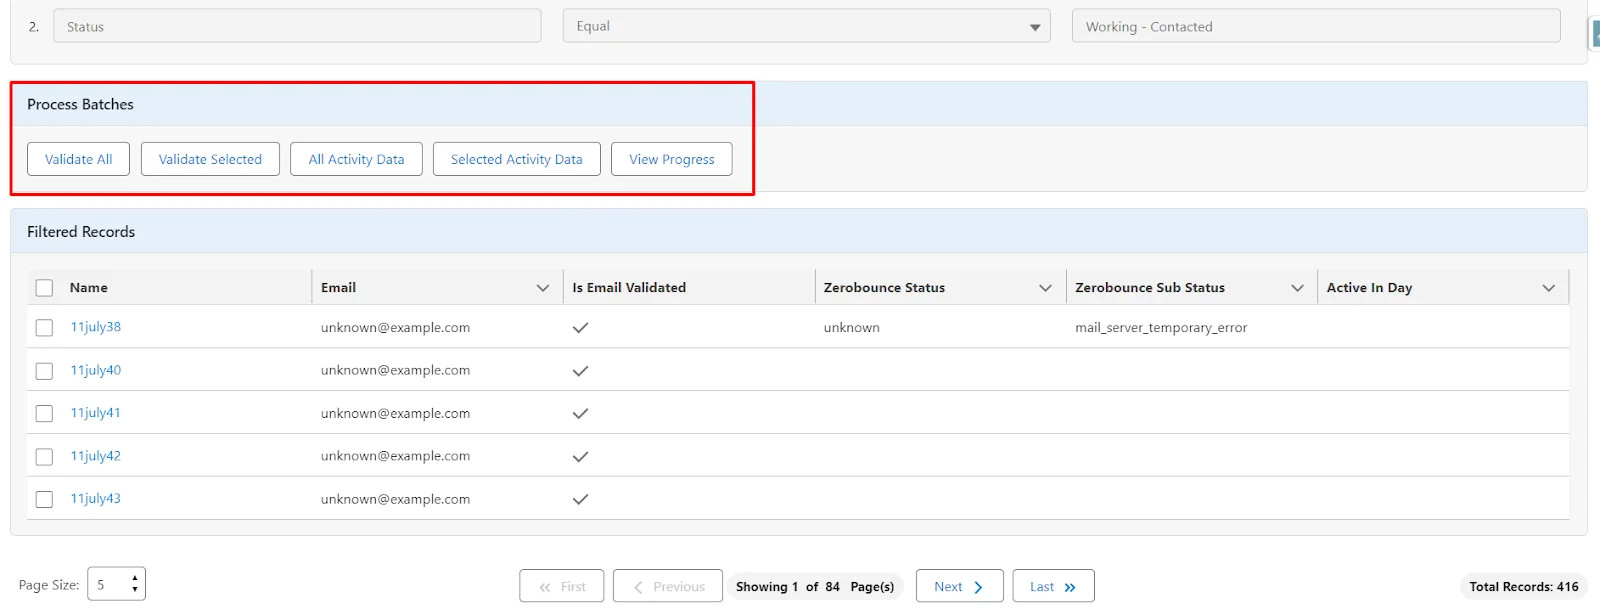
- Once again, it will open the options to validate the email of records and view the progress for the "Validate All" and "All Activity Data" batches.
- You can validate the records as described in the previous points.
- Schedule Batch For List View
- In this tab, you can schedule the "Validate All" or "All Activity Data" batch for the list view. Begin by selecting the object and list views that you created from the first tab for the selected object.

The screen is comprised of four dropdowns:
- Select Object: Choose the object either "Lead" or "Contact."
- Select List View: Select the list view name for the selected object that you want to schedule.
- Select Batch: Choose between "Validate All" or "All Activity Data" batch to schedule.
- Schedule Batch: Select when you want to schedule the batch. Options include "Daily," "Weekly," "Monthly," "Yearly," and "Custom."
Depending on the selected option from the "Schedule Batch" dropdown, a fifth field will appear.
a) Daily
- If you select the "Daily" option to schedule the batch, a fifth field will appear, allowing you to choose the time for the scheduled batch.

- You can select the desired time from the dropdown menu and then click on the "Schedule Batch" button to finalize the scheduling of the batch.

- This signifies that you intend to schedule the batch for the Lead object with the "All Leads" list view for the "Validate All" batch to run daily at the selected time (in this case, 12:30 AM). The batch will execute automatically at the designated time each day.
- Upon clicking the "Schedule Batch" button, you will encounter the following screen along with a toast message.

b) Weekly
If you choose the "Weekly" option, a fifth field will appear with two dropdown menus:
- Days: You can select the day(s) of the week on which you want the batch to run.
- Time: You can specify the time at which the batch should execute on the selected day(s).
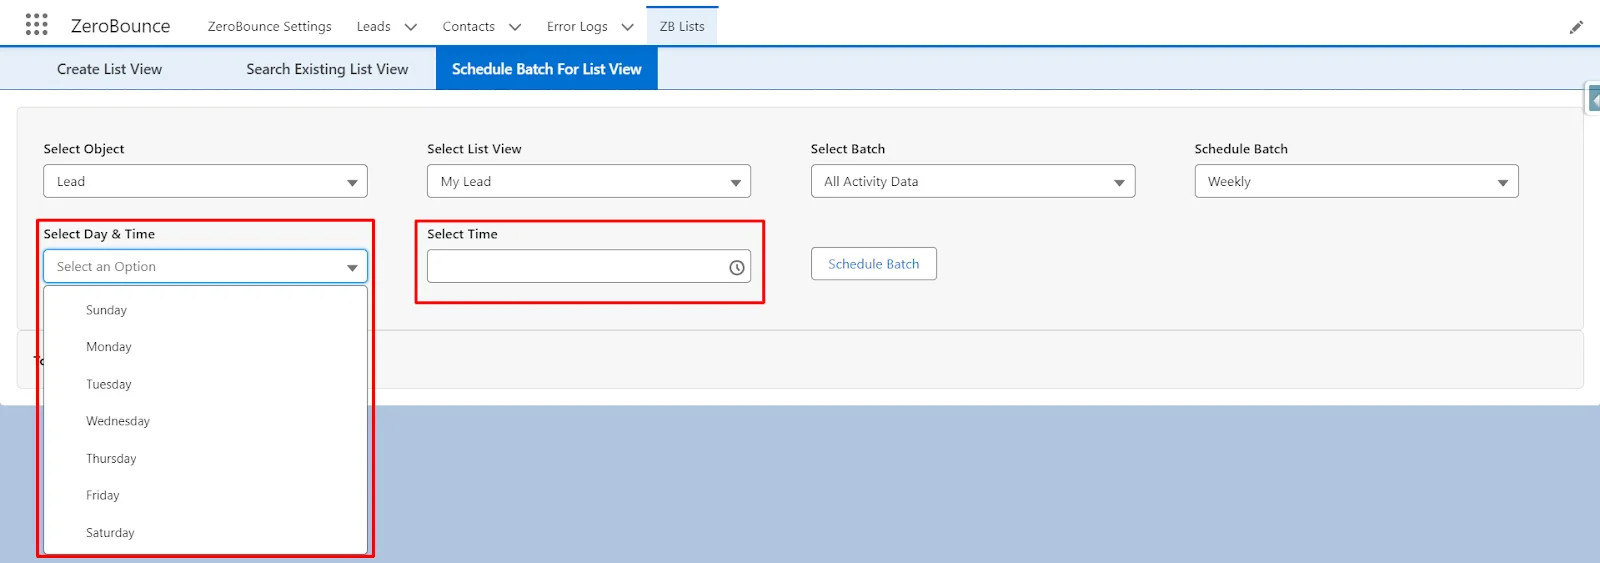
- To schedule the batch weekly, you need to specify both the day of the week and the time at which you want the batch to run.
- First, select a day from the highlighted dropdown menu, indicating the day of the week on which the batch should execute. Then, choose the desired time from the "Select Time" dropdown menu.

- In this scenario, the batch will be scheduled for the Lead object with the "My Lead" list view for the "All Activity Data" batch on a weekly basis. The batch will automatically execute every Monday at the selected time, which is 1:00 AM in the morning.
c) Monthly
- If you select the "Monthly" option to schedule the batch, a fifth field will appear as follows:

- To schedule the batch monthly, you need to specify the date of the month on which the batch should run, along with the desired time to start the batch.
- Enter the date of the month, choosing any value between 1 and 31, and select the desired time from the "Select Time" dropdown menu.

- In the provided screen, the "All Activity Data" batch for the Lead object, specifically for the list view "My Leads," is scheduled to run on the 30th day of each month. The batch will commence at 2:00 AM.
d) Yearly
- If you choose the "Yearly" option to schedule the batch, the fifth field will appear with a date picker and a time dropdown menu, as illustrated below:
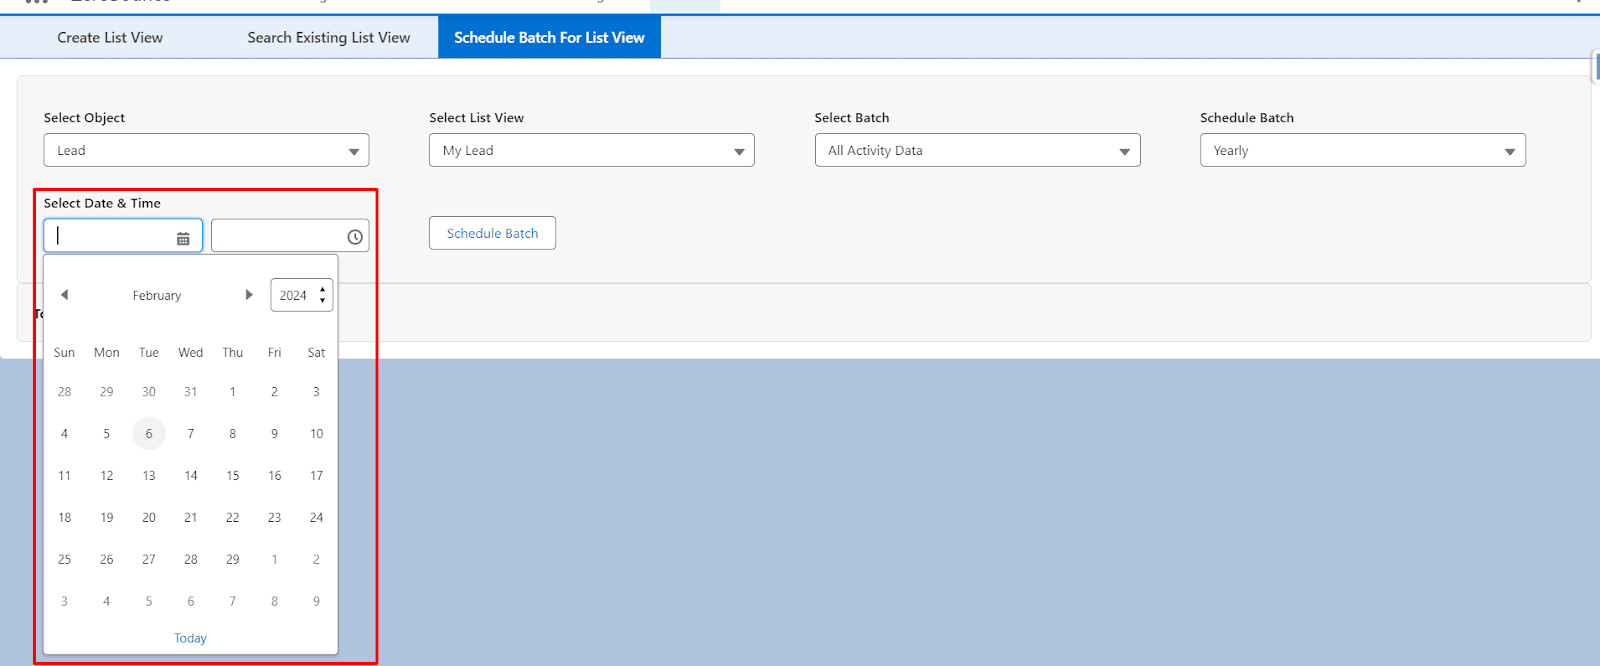
- To schedule the batch yearly, you must specify the date and time for the batch to execute. Choose the date from the date picker and the time from the time dropdown menu. Then, click on the "Schedule Batch" button to finalize the scheduling of the batch.

- In the provided screen, the "All Activity Data" batch for the Lead object, specifically for the list view "My Lead," is scheduled to run on the 7th of February every year. The batch will start at 8:00 AM.
e) Custom
- If you choose the "Custom" option to schedule the batch, the fifth field will appear similar to that of the "Yearly" option.
- You will need to select the date from the date picker, choose the time from the time dropdown, and then click on the "Schedule Batch" button to schedule the batch.

- In the provided screen, the "Validate All" batch for the Lead object, specifically for the "Working or Open Leads" list view, is scheduled to run at the selected date and time, but only once.
- To cancel or abort the scheduled batch, you can click on the given hyperlink.

- By clicking on the hyperlink, you will be redirected to the Schedule Job screen.

- Here, you can view all the scheduled batches of your organization. We have set the job name as "List View Name + Object Name + Batch Name + System Time" to facilitate easy identification of the job.
- To abort or cancel a scheduled job, simply click on the "Del" hyperlink located before each job name.
- Delete List View
- To delete the list view, the user must be an Admin and follow the steps below to delete the created List View.


Considerations and Limitations:
- Data Table Display: The data table displays records for the selected object by defining filters or choosing "All" from the Condition Requirements dropdown in the Create List View tab. It can show up to 49,999 records, even if more records are available in the backend.
- Batch Processing: During the processing of the "Validate All" or "All Activity Data" batch, it works on all available records, even if they exceed 49,999. You can view the progress of batch processing in the "View Progress" popup by clicking on the "View Progress" button.
- Maximum Records Displayed: The data table displays a maximum of 100 records per page. Therefore, when selecting records for "Validate Selected" or "Selected Activity Data," you can only select up to 100 records at a time for validation.
- Viewing Batch Progress: If the "Validate All" or "All Activity Data" batch is in progress for the selected object, you can view the results in the same data table only when the "View Progress" popup is open. If the popup is not open, the results will still be updated in the backend.
- Batch Completion Notification: If the "Validate All" or "All Activity Data" batch is in progress and there are very few records to process, you may see a direct 100% progress in the progress bar within the modal popup. Otherwise, if the popup is not opened to view the progress, it may default to indicating that the "Validate All" batch is not in progress and the "All Activity Data" batch is not in progress. This is because the batch might have finished processing due to the small number of records.