Understanding Email Verification Results and Metrics
After completing the email verification process, ZeroBounce provides you with your validation results in an encrypted file. You'll also see a variety of metrics on your dashboard that reflect key highlights for each email list you upload for cleaning.
Here's how to review your results and metrics so that you can put your clean emails to great use.
Reading your email verification dashboard results
Any time you upload a list of emails to ZeroBounce's email verifier, you'll see an overview report of your results along with a link to download the file.

This section will show the name of your uploaded file along with the processing date.
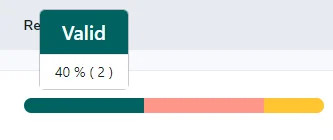
To the right of the file name, you'll see two additional sections titled "Emails" and "Results". "Emails" will highlight the overall validity of the email list as a percentage (i.e., 40% Valid). It also shows the total number of emails validated in that particular file.
The "Results" column shows a color-coded bar that segments your email verification results into categories by color. When you hover over a color, you'll see the email type along with the corresponding percentage. For example, if the bar reads “Valid - 40%,” this means 40% of the emails in your file were valid.
You can also obtain a more detailed breakdown of your entire email list by clicking "Expand Results."

This screen will show you the number of emails that were determined to belong to each category, along with the corresponding percentage. The email address types are as follows:
- Valid - The email is genuine and in use
- Invalid - Email is nonexistent or no longer in use
- Catch-all - The email is a catch-all used by the company; used to receive emails sent to invalid email addresses on that domain
- Spam trap - This is a trap created by spam prevention services to catch senders that aren't using best email practices
- Abuse - The owner of this email is a known spam complainer
- Do not mail - Emails not safe or not meant to receive mail (disposable, toxic domain, etc.)
In the row beneath the email address types, you'll find additional data about your email list, including:
- First name - The number of emails with the owner's first name appended
- Last name - The number of emails with the owner's last name appended
- Gender - The number of emails with the owner's gender appended
- Duplicate emails - The number of duplicate email addresses found on the list (Note that ZeroBounce removes duplicate emails for free)
- Rows without emails - Number of rows in your spreadsheet that didn't include an email address. Double-check your file for mistakes in entry
- Bad Characters - Email addresses that contain wrong or invalid characters; these will give an invalid result
- Malformed - The number of emails that don't use the correct syntax; these will give an invalid result
How to access your email verification results file
- To review your complete results file, you can download it using the link in the email validation results overview. This will bring up the appended data selection screen.
- By selecting the toggle, you can choose to add new columns to your results file that will contain the matching data if discovered. If you toggle "First Name," ZeroBounce will attempt to find the email address owner's first name and add it next to the address.
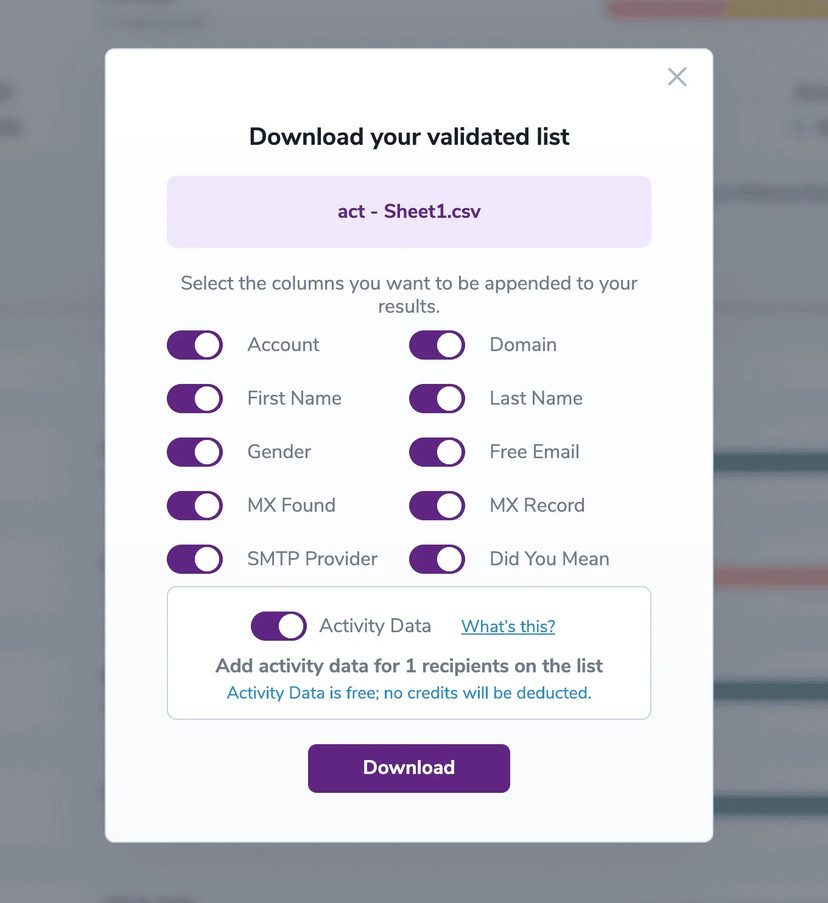
All appended data is free. However, there's no guarantee that it will be available for inclusion.
Important Note - The final section also provides the option to add Activity Data. Activity Data gives you deeper insights into the recent activity level of the email address, including opens, clicks, forwards, and unsubscribers.
- Click "Download."
- You'll now have a zipped, encrypted file in your device's download destination. To unzip this file, you'll need a password.

To find the password, check your inbox for an email from ZeroBounce. This unique encryption key ensures that no other users can ever access your email verification results or email list data. ZeroBounce generates a new password every time you click the download link.
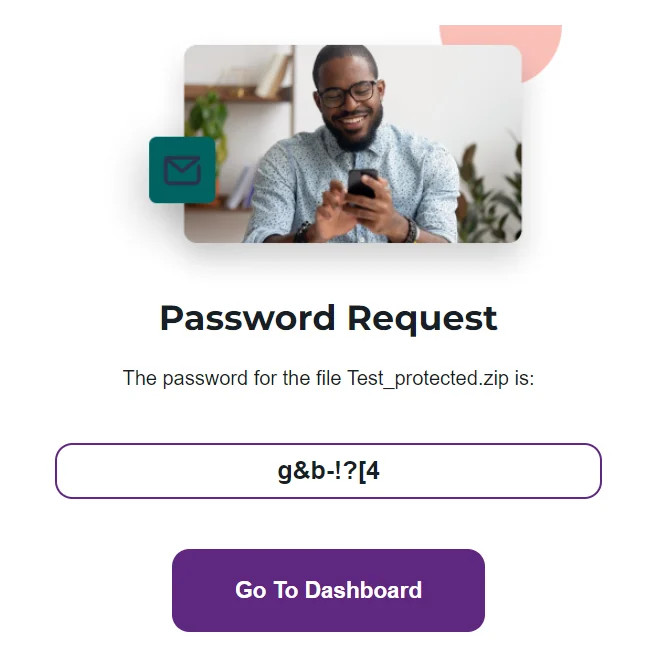
- Enter the password to unzip the file.
Reading your email verification results
With your email verification results file opened, you have a few places to start.
Overview report
First, you can start with your Overview file indicated by "filename_overview". This PDF provides a top-level look at what happened with your email list cleaning.
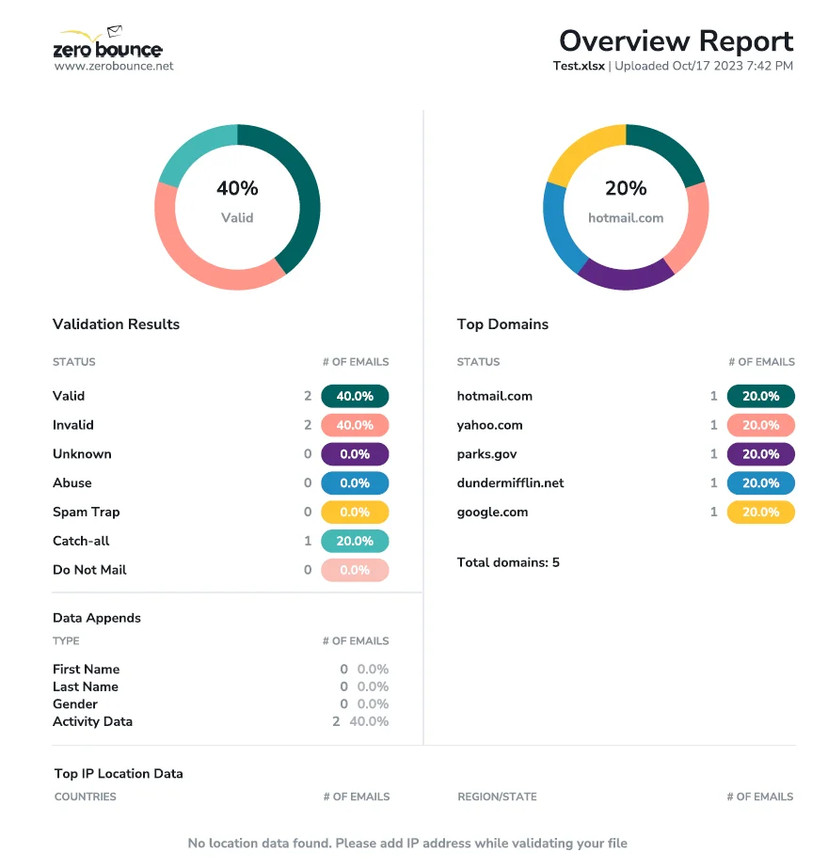
Similar to the report found in your ZeroBounce dashboard, the Overview report provides various visual representations of your email list cleaningⓘ results. The 'Validation Results' section shows each email status, the number of emails in that category, and the percentage of them across your whole list.
“Data Appends” once again shows added data, including names, gender, and Activity Data. The colored graph simply provides a different visual breakdown.
The ‘Top Domains’ section breaks down all of the email domains found on the list. It details the number of emails that fall into each domain, along with the percentage across the entire list.
Finally, the bottom section features geolocation data (if available), including the country or region where the email address originates from based on IP information.
CSV files
The last results area to check is the CSV files within the results folder. Inside, you'll find one CSV that shows all results, along with additional CSV files that segment your emails by status.
If you need a refresher on the various email statuses, scroll back up to the earlier section in this section regarding your dashboard results.
Once you’ve familiarized yourself with your email verification results, you can use the CSV files as needed to replace your existing email list. It’s recommended to use your “Valid” file as it contains all of the email addresses that are safe for use.
However, you should also review the other email statuses to get a better idea of what was lurking on your email list. If you notice a high volume of risky emails from particular sources, you can use the data to start implementing safeguards for your future marketing campaigns, such as blacklisting or whitelisting certain email domains.
Final thoughts
After uploading your file for email verification, you'll be able to download the results for 30 days. Once the period expires, ZeroBounce automatically deletes all data. This security measure protects your account and email data from unnecessary risks. Be sure to download your results and store them in a safe place to avoid losing them.
ZeroBounce's email verification results all provide the same data, whether you're using the bulk upload tool, the single email verifier, or the email verification API.
Additional resources
Understanding the Executive Report
Related Articles
Generating HAR files in various browsers