What Is a HAR File?
An HTTP Archive (HAR) file is a troubleshooting file that allows you to examine the call and response between a browser and a website. HAR files are JSON-formatted and allow you to capture critical data insights regarding web traffic at any given time.
Why should I use HAR files?
HAR files are essential for diagnosing the overall health of your website and any issues experienced by your incoming web traffic, including:
- Slow load times
- Incorrect file formats
- Missing assets
- Timeouts with running tasks
HAR files use the JSON format (JavaScript object notation syntax). By capturing data regarding web traffic at any given time, you can gather critical insights into the health of your website.
Identifying and addressing website issues is essential for both your SEO and email marketing efforts. Problems with slow loading speeds, bad URLS and destinations, and unavailable content leaves a bad impression, and your emails feeling spammy.
How do I create a HAR file?
The method for creating a HAR file depends upon your web browser. The most popular modern browsers natively support HAR files, including Chrome, Edge, and Firefox. You can generate HAR files for a given website by accessing the developer tools within your browser.

For more in-depth instructions on how to generate HAR files for a browser, use the tutorials linked below:
- Generating HAR files in Google Chrome
- Generating HAR files in Mozilla Firefox
- Generating HAR files in Safari
- Generating HAR files in Microsoft Edge
- Generating HAR files in Internet Explorer
How do I review a HAR file?
Once you generate your HAR file from your browser, you'll need software that lets you view HAR files. There are a variety of free tools available, but Google's HAR Analyzer is one of the top recommended tools available.

Inside, you'll find a log of pages documented along with a list of entries/responses captured during the period. You'll be able to identify the date and time the file was generated, along with the relevant pages and response codes.
Be sure to take advantage of HAR files, as they are free to generate and review. They are an excellent asset for improving your website experience for users and maintaining good standing for your domain with search engines.
Related Articles
Generating HAR files in various browsers
How to clean your email list effectively using ZeroBounce
Tips for improving email deliverability
Understanding email verification results and metrics
Generating HAR Files in Various Browsers
To generate a HAR file for your website health diagnosis, use the instructions for your specific web browser below. HAR files can be helpful in helping the ZeroBounce team identify any network errors that are interfering with your ability to use the platform.
- Google Chrome
- Mozilla Firefox
- Safari, Microsoft Edge
- Microsoft Edge
How to generate HAR files in Chrome
To generate a HAR file in Chrome, follow these steps:
- In Google Chrome, navigate to the website page you wish to examine.
- Open the Chrome developer tools.
On Mac, press Command+Option+J.
On Windows or Linux, press Control+Shift+I.
If successful, your browser will display a menu similar to what’s pictured below.

- Select "Network" using the menu at the top. Your developer tools should appear like this:

- On the "Network" tab, go to the top and check the boxes next to "Preserve Log" and "Disable Cache."
- Refresh the page. The menu should now populate with information regarding the network traffic between your browser and the website.
- After the page loads, right-click any particular item on the Network tab. Select "Save all as HAR with content."

You can now find the HAR file in your downloads or whichever destination you selected. You may review the data in a HAR viewer or submit it to the ZeroBouce team for troubleshooting.
How to generate HAR files in Firefox
To generate a HAR file in Firefox, use the following steps:
- Navigate to the webpage you wish to troubleshoot.
- Open the Web Developer Console with Command+Option+I (Windows) or Command+Option+J (Mac).
If successful, your browser should now display the menu pictured below:

- Click on the "Network" tab.

- Check the box next to "Disable Cache." Then, click the gear on the right and select "Persist Logs."
- Refresh the page to show the network traffic between your web browser and the website.
- Right-click any item now listed in the menu. Select "Save all as HAR" and save the file to your computer.

You can now review the HAR file with a HAR viewer or submit it to the ZeroBounce team for troubleshooting.
How to generate HAR files in Safari
To generate a HAR file in Safari, follow these steps:
- Navigate to the webpage you wish to diagnose.
- Open the Web Inspect with Command+Option+I. Upon success, your browser will display the screen pictured below:
- Click on the "Network" tab. The menu should be updated and look similar to what’s pictured below.
- Check the boxes next to "Preserve Log" and "Disable Cache."
- Refresh the page. The Network tab should now populate with network traffic between your browser and the website.
- Right-click any of the new elements populating the table. In the menu, select "Export HAR."
You can review your new HAR file with a HAR viewer or submit it to the ZeroBounce team for review.
How to generate HAR files in Edge
To generate a HAR file in Edge, use the following steps:
- Navigate to the page that you wish to examine.
- In the browser, press Control+Shift+I to open the Developer Tools.
If successful, your browser will display a menu similar to what’s pictured below.

- Click the arrows in the top menu and select "Network." Your screen should now update to something similar to what’s pictured below.

- Check the boxes next to "Preserve Log" and "Disable Cache" at the top.
- Refresh the page. The Network tab will update with network activity between your web browser and the website.
- In the top menu, find the down arrow that will read "Export HAR" when hovering over it. Click this to download the HAR file.
You can review your HAR file with a HAR viewer or submit it to the ZeroBounce team for review. If you have any issues with any of the instructions listed above, please contact the ZeroBounce support team at support@zerobounce.net for additional assistance.
Related Articles
How to clean your email list effectively using ZeroBounce
Tips for improving email deliverability
Understanding email verification results and metrics
How to Clean Your Email List Effectively Using ZeroBounce
ZeroBounce provides everything you need for comprehensive email list cleaning, including bulk email verification for your current list and a real-time verification API for new signups.
To help you clean your email list effectively using ZeroBounce, follow these step-by-step tips below.
Step 1 - Use bulk email verificationⓘ
If you've never cleaned your email list or haven't done so for a while, uploading your database for bulk email list cleaningⓘ is the best place to start.
You can upload your entire email list for bulk email verification or clean a few emails at a time
There's no limit on how many contacts you can upload for bulk email verification. Just ensure that you have enough credits to verify each email address on the list.
It's recommended to use bulk email verification once every three months (at least). This process helps you keep up with natural email list decay, keeps your list up-to-date with valid email contacts, and boosts your email deliverability.
Step 2 - Review your email verification results
After the bulk email verificationⓘ process is completed, you can download your results.
This encrypted file will contain multiple CSV files categorizing the processed email addresses by type. You'll find CSV files titled "Valid," "Invalid," "Catch-all," etc.
With your files, do the following:
- Add the "Valid" emails back into your primary email list. All of these email addresses are in use by real people, and you can expect to deliver your messages to them successfully.
- Remove all of the "Invalid" emails from your list. The simplest way to do this is to upload your "Valid" file to your CRM or email service provider and replace your existing list there.
- Remove critical high-risk emails, such as spam traps and disposable emails, from your email list.
Abuse emails also often fall under this category. These accounts are known to report content as spam, which can cause your spam complaint rate to rise. However, these emails are valid.
If you're familiar with the contacts on your email list, you may use your best judgment as to whether it's worth the risk of continuing to email this abuse email contact. If you have any suspicion that they aren't reading your contact and reporting you as spam, it's best to remove them. - Review your catch-all email addresses. Catch-all may or may not be in use by a company to collect all incoming emails sent to an otherwise invalid address on that domain. In many cases, a catch-all or role-based catch-all email will result in a bounce, but they can also be valid leads. There are a few recommended ways to manage these emails. First, if you’re not comfortable with the risk, you can opt to remove them from your email list. You’ll have the security of knowing that your sender reputation and email deliverability will be safe. However, if you feel that some of these catch-alls may be viable leads, it’s recommended to segment them into a new list. This way, you can test emails to these accounts without interfering with your primary mailing list campaigns. If those emails bounce, eliminate the catch-alls from your list. Finally - ZeroBounce offers an email scoring service, which is an excellent way to analyze your catch-all emails. You can leverage this artificial intelligence to learn about the account’s activity and engagement levels to determine the likelihood that it’s in use. It’s recommended to score your catch-alls, segment those that score well, and see how they perform.
See also: Email verification status codes >
Step 3 - Clean new email lists before merging them with your database
Similar to the first step, ZeroBounce recommends cleaning any new email lists you obtain before adding them to your previously cleaned list. If you're sponsoring or attending events or running new campaigns and promotions, you're likely to gather many new email addresses that you're eager to email.
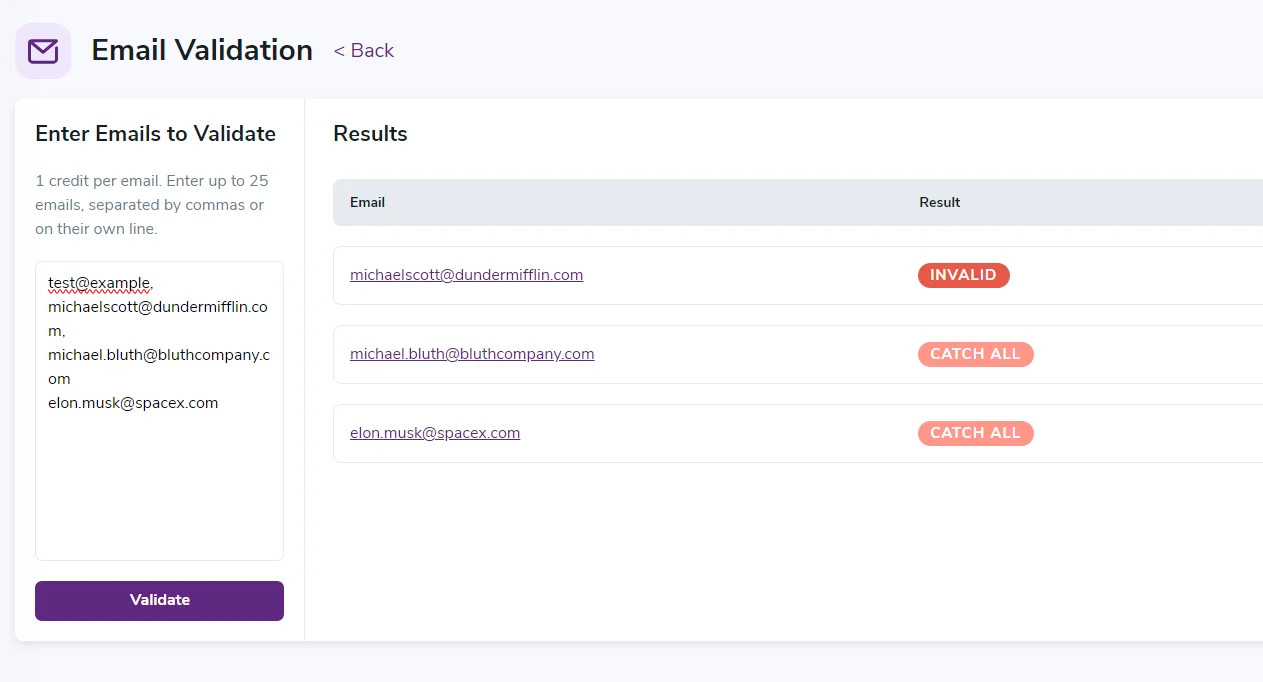
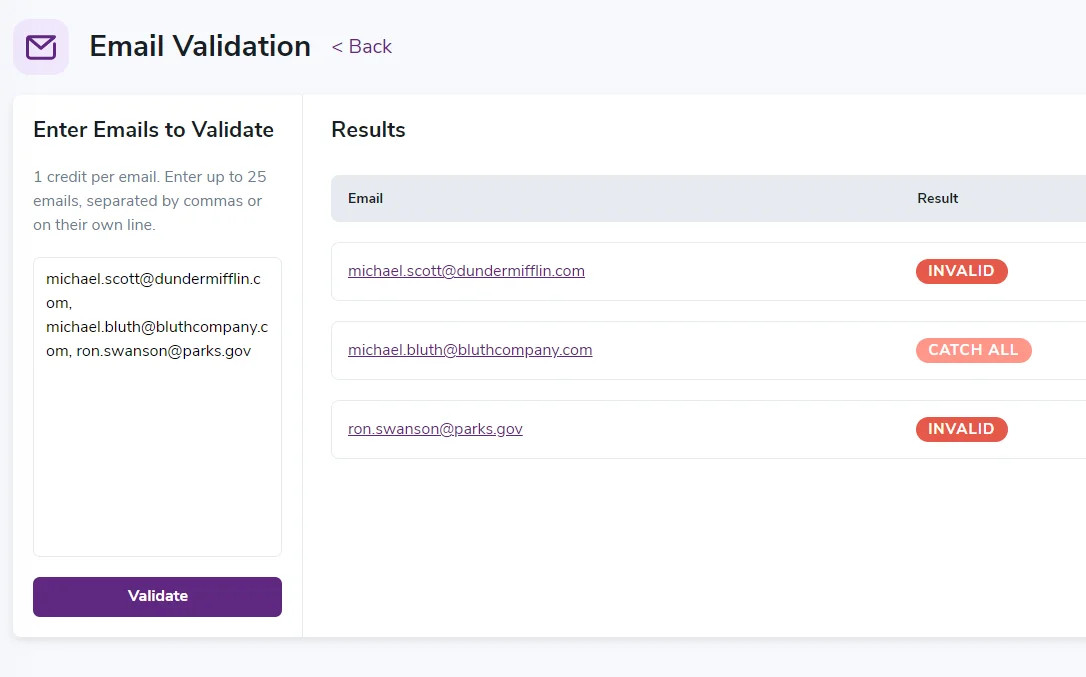
You can also verify small batches of emails (up to 25) with the single email validationⓘ tool*
Before you do that, upload those new, smaller lists for verification. Then, repeat step two to filter out your high-quality leads from the invalid ones.
Step 4 - Manage new emails with real-time email verification
While bulk email verification is used to manage your existing email list, you need a way to filter out the bad leads automatically.
The ZeroBounce real-time email verification API allows you to do this by adding the email verifier to your website, landing pages, and anywhere else you obtain new emails. When a user enters their name and email, the email verifier API verifies the email and rejects any invalid or high-risk addresses.
The real-time email verifier automatically spots invalid emails*
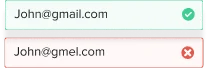
The real-time email verification API will also help you boost legitimate signups and conversions by advising users to correct mistakes with their addresses, such as typos or misspellings.
ZeroBounce's email service API is available in more than a dozen programming languages with complete documentation on how to use it.
If you're not familiar with or comfortable with using the API, there are still solutions for you. ZeroBounce offers more than 60 integrations and plugins with popular CRMs, marketing platforms, and email service providers. In many cases, you can leverage the ZeroBounce API just by connecting your two accounts with an API key.
With a combination of bulk and real-time email verification, you can clean your email list effectively using ZeroBounce - and keep it clean.
If you have any questions about the ZeroBounce email verification service, the team is available 24/7 via email and live chat. Reach out to ZeroBounce today at support@zerobounce.net for more details.
Related Articles
Generating HAR files in various browsers
Tips for improving email deliverability
Understanding email verification results and metrics
Tips for Improving Email Deliverability
Email deliverabilityⓘ is the likelihood or guarantee that your email messages will reach the inbox. A "delivered" email receipt isn't the same as deliverability, as many messages can end up in the spam folder if your email deliverabilityⓘ is poor. The inbox is where your subscribers check most frequently and will provide your company with the highest engagement and conversion rate.
Below, you can find quick tips for improving email deliverabilityⓘ so that your email marketing is worth the investment.
Tip 1 - Use email verification
First and foremost, you need to practice regular email list cleaning. Email verification will identify and eliminate any invalid or high-risk email addresses that are either guaranteed or likely to bounce. You can’t deliver emails if the destination doesn’t exist.
Plus - the higher your email bounce rate is - the worse your email deliverability will be. Internet service providers (ISPs) use email campaign metrics like bounce rate to determine the trustworthiness and reliability of a sender.
If you're regularly bouncing emails at a high rate (more than 2%), you look less like a legitimate company and more like a spammer.
Use an email verification service, at minimum, every three months. Email lists decay on average at roughly 23% annually. Therefore, regularly cleaning your list will combat this gradual decay and keep your email database up to date.
Tip 2 - Use a real-time email verification APIⓘ
While uploading your email list for email validation periodically is essential, a real-time email verifier can further safeguard your email marketing. Here’s how it works.
Email verification companies provide an API, which stands for Application Programming Interface, and allows the email verifier to communicate with another application. This API connection makes it possible for you to begin verifying emails in other key locations, including your websites, landing pages, and other spots where you have email registration or signup forms.
With the real-time email verification API active, it will auto-verify emails entered into your form. If the verifier detects an invalid or other high-risk email type, it will block it. Then, it advises the user to use a valid email address.
In other words, a real-time email verifier stops invalid emails from entering your database in the first place. This technology keeps your email list clean, leading to low email bounce rates, better email engagement, and more conversions.
It can also aid your customers by alerting them to accidental entry issues, such as typos or misspellings with their data. You'll connect with more customers who want email content from your business.
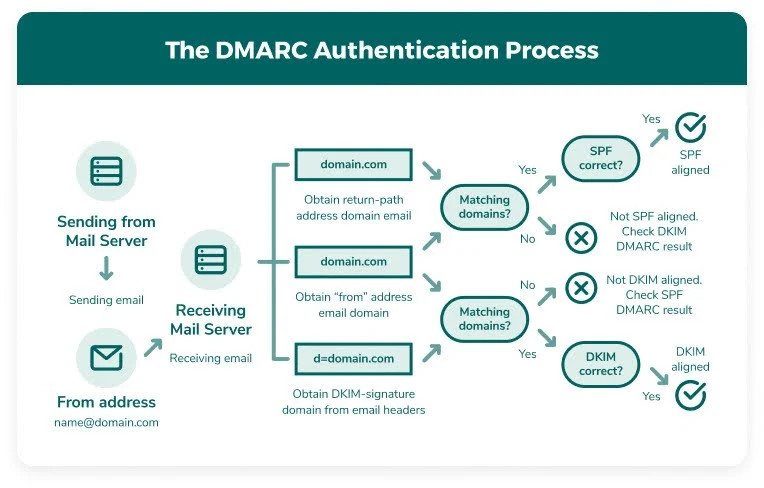
Tip 3 - Use email authenticationⓘ
Email authenticationⓘ is a system or process of providing an email domain with identifying information to prove that the party sending the message is legitimate and authorized.
The most commonly used ways of authenticating emails include:
- Sender Policy Framework (SPF)
- DKIM (DomainKeys Identified Mail)
- DMARC (Data Messaging Authentication, Reporting, and Conformance)
Each process provides a different way of authenticating an email, including creating a list of allowed domain or IP addresses, as well as adding digital signatures to sent emails. DMARC is then a policy that tells receiving email domains what to do if a sender fails or passes these checks. You may choose to allow, reject, or even quarantine messages from suspicious senders.
Email authentication is not only a free way to protect your emails and sender reputation, it will be a requirement for popular domains like Google and Yahoo.
Take advantage of free email authentication generators to add protection to your email domain for better email deliverability. Plus, you can supervise your domain's email authentication with tools like DMARC monitor and get instant alerts to suspicious email activity.
- Free SPF generator
- Free DKIM generator
- Free DMARC generator
Tip 4 - Segment your email lists
ISPs also look at engagement metrics like open and click rates, spam complaints, and unsubscribes. The better your emails perform, the better your sender reputation is and the higher your email deliverability will be.
ISPs want to ensure that their users are receiving the email content they want to read.
One of the best ways to improve your email campaign performance is to segment your email lists.
When your email marketing list has tens of thousands of subscribers, it’s unlikely that one email will speak to every person with the same impact. While those contacts willingly subscribed to your list, each person comes from a different walk of life and has different things they’d like to hear from your company.
By segmenting your email lists, you give yourself the opportunity to personalize the content for the reader.
Segment your audience by their stage in the buyer's journey, demographic, products or services used, last purchase date, and any other categories that may be relevant to their experience. The better you're able to meet their specific needs, the better your emails will perform.
Tip 5 - Test and update email content as necessary
Continuing with segmentation, you must continue to test new types of email content and revise based on performance.
If you've followed the previous email deliverabilityⓘ tips, you should have a clean email listⓘ of valid contacts and a few segmented email lists to test. Next, it's time to try some catchy, intriguing subject lines that will attract a higher open rate. Make it clear what's inside (being vague or indirect is annoying), but leave some excitement to be found inside.
The body of the email also needs to be lean and valuable. Though you earned the reader's subscription, they likely receive dozens of emails like yours daily. For the few seconds that you have their attention, you need to ensure your words count by offering something memorable and of value.
Don't settle for just addressing the reader by name - that's the bare minimum. Acknowledge who they are as a customer or professional, call out their specific problem, and provide the solution. A great way to do this is to provide resources and education that benefit them at no cost.
It can take time to find the right formula for your brand's particular email content. Be diligent about testing and measuring results, and make changes in the areas needed.
Finally - you can also take a direct approach by asking your readers what they want to see.
Tip 6 - Monitor your sender reputation
You've cleaned up your database, authenticated your emails, and created great email content. Now, it's time to supervise your domain and sender reputation.
Even with email marketing best practices, there are always factors that can negatively affect your sender reputation and email deliverability. All it takes is one too many spam complaints, emailing a spam trap, or an instance of email fraud to flag your company's email domain.
There are a variety of email monitoring tools online that can assist with monitoring different aspects of your reputation. DMARC monitor, for example, allows you to get notified whenever attackers or imposters are trying to spoof your email domain. The sooner you're aware of suspicious activity, the quicker you can take action to protect yourself.
Likewise, blacklist monitoring is the best way to get notified of any unintentional or accidental email infractions. If you see your domain or IP appear on a blacklist, you can act fast and work with the blacklist service to resolve the issue.
After all, ISPs don't want to stop legitimate companies from reaching customers. The more proactive you are in managing your email domain and reputation, the more likely you are to be awarded with strong email deliverability.
6 tips for improving email deliverabilityⓘ
To summarize quickly, every email sender needs to use the following tips to boost their email deliverabilityⓘ:
- Use email verification to eliminate invalid, risky emails
- Add a real-time email verifier API to your site to block bad emails automatically
- Authenticate your emails with SPF, DKIM, and DMARC
- Segment your email lists for more personalization and better performance
- Continue testing and measuring your email content's effectiveness
- Monitor your email domain and sender reputation daily
So long as you're always striving to deliver great email content and protect your readers, ISPs will award you with strong email deliverability.
For even more in-depth email deliverability tactics, check out the Complete Guide to Email Deliverability.
Related Articles
Generating HAR files in various browsers
How to clean your email list effectively using ZeroBounce
Understanding email verification results and metrics
Understanding Email Verification Results and Metrics
After completing the email verification process, ZeroBounce provides you with your validation results in an encrypted file. You'll also see a variety of metrics on your dashboard that reflect key highlights for each email list you upload for cleaning.
Here's how to review your results and metrics so that you can put your clean emails to great use.
Reading your email verification dashboard results
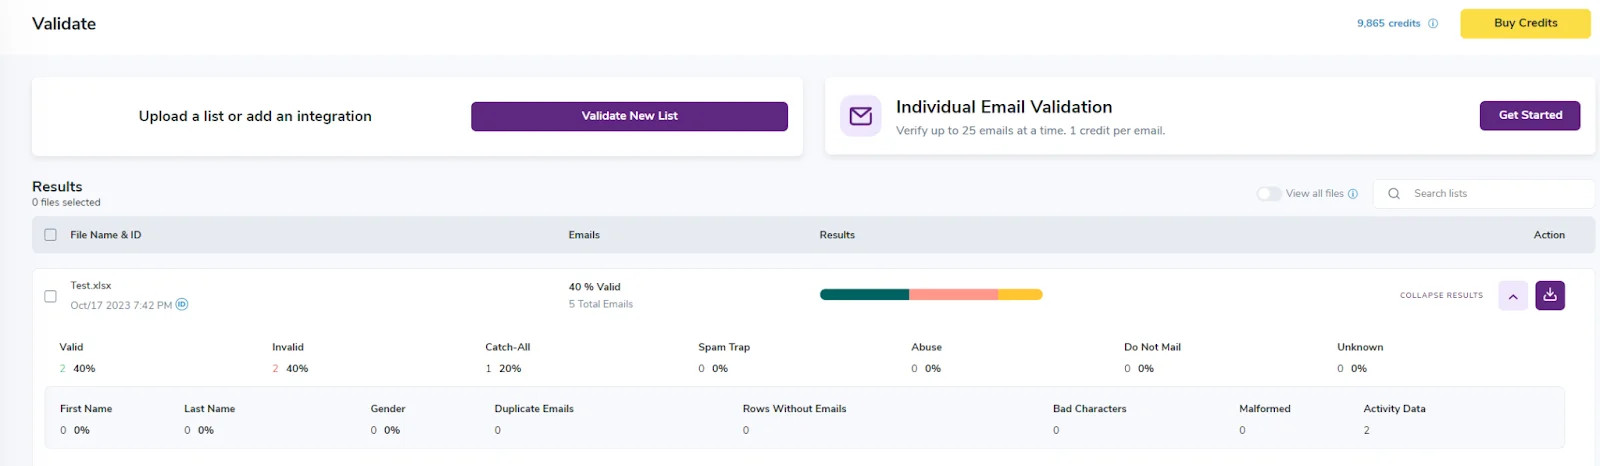
Any time you upload a list of emails to ZeroBounce's email verifier, you'll see an overview report of your results along with a link to download the file.

This section will show the name of your uploaded file along with the processing date.
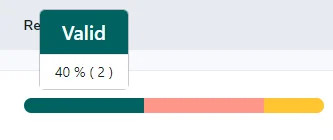
To the right of the file name, you'll see two additional sections titled "Emails" and "Results". "Emails" will highlight the overall validity of the email list as a percentage (i.e., 40% Valid). It also shows the total number of emails validated in that particular file.
The "Results" column shows a color-coded bar that segments your email verification results into categories by color. When you hover over a color, you'll see the email type along with the corresponding percentage. For example, if the bar reads “Valid - 40%,” this means 40% of the emails in your file were valid.
You can also obtain a more detailed breakdown of your entire email list by clicking "Expand Results."

This screen will show you the number of emails that were determined to belong to each category, along with the corresponding percentage. The email address types are as follows:
- Valid - The email is genuine and in use
- Invalid - Email is nonexistent or no longer in use
- Catch-all - The email is a catch-all used by the company; used to receive emails sent to invalid email addresses on that domain
- Spam trap - This is a trap created by spam prevention services to catch senders that aren't using best email practices
- Abuse - The owner of this email is a known spam complainer
- Do not mail - Emails not safe or not meant to receive mail (disposable, toxic domain, etc.)
In the row beneath the email address types, you'll find additional data about your email list, including:
- First name - The number of emails with the owner's first name appended
- Last name - The number of emails with the owner's last name appended
- Gender - The number of emails with the owner's gender appended
- Duplicate emails - The number of duplicate email addresses found on the list (Note that ZeroBounce removes duplicate emails for free)
- Rows without emails - Number of rows in your spreadsheet that didn't include an email address. Double-check your file for mistakes in entry
- Bad Characters - Email addresses that contain wrong or invalid characters; these will give an invalid result
- Malformed - The number of emails that don't use the correct syntax; these will give an invalid result
How to access your email verification results file
- To review your complete results file, you can download it using the link in the email validation results overview. This will bring up the appended data selection screen.
- By selecting the toggle, you can choose to add new columns to your results file that will contain the matching data if discovered. If you toggle "First Name," ZeroBounce will attempt to find the email address owner's first name and add it next to the address.
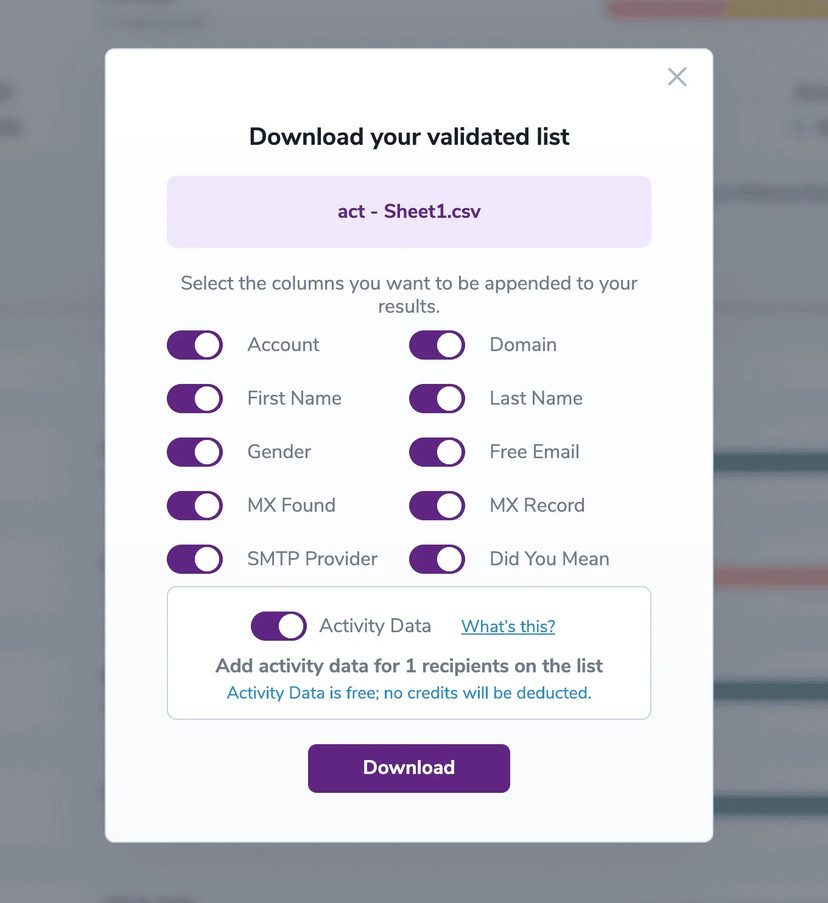
All appended data is free. However, there's no guarantee that it will be available for inclusion.
Important Note - The final section also provides the option to add Activity Data. Activity Data gives you deeper insights into the recent activity level of the email address, including opens, clicks, forwards, and unsubscribers.
- Click "Download."
- You'll now have a zipped, encrypted file in your device's download destination. To unzip this file, you'll need a password.

To find the password, check your inbox for an email from ZeroBounce. This unique encryption key ensures that no other users can ever access your email verification results or email list data. ZeroBounce generates a new password every time you click the download link.
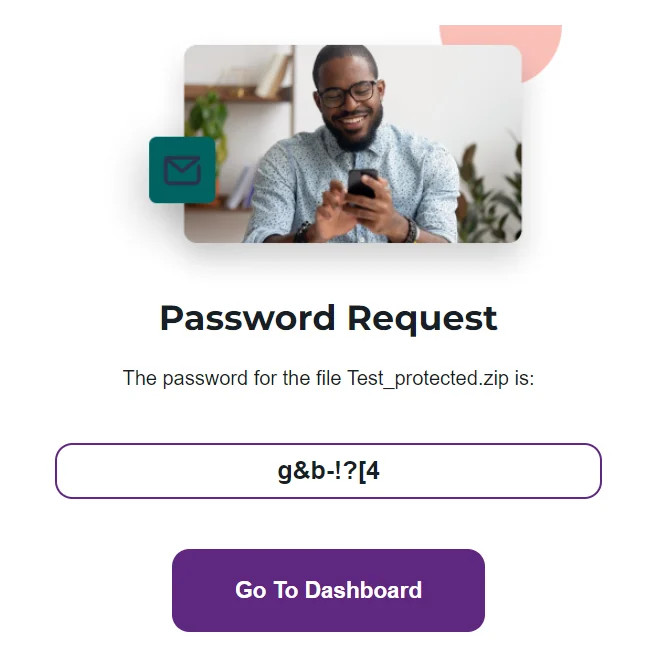
- Enter the password to unzip the file.
Reading your email verification results
With your email verification results file opened, you have a few places to start.
Overview report
First, you can start with your Overview file indicated by "filename_overview". This PDF provides a top-level look at what happened with your email list cleaning.
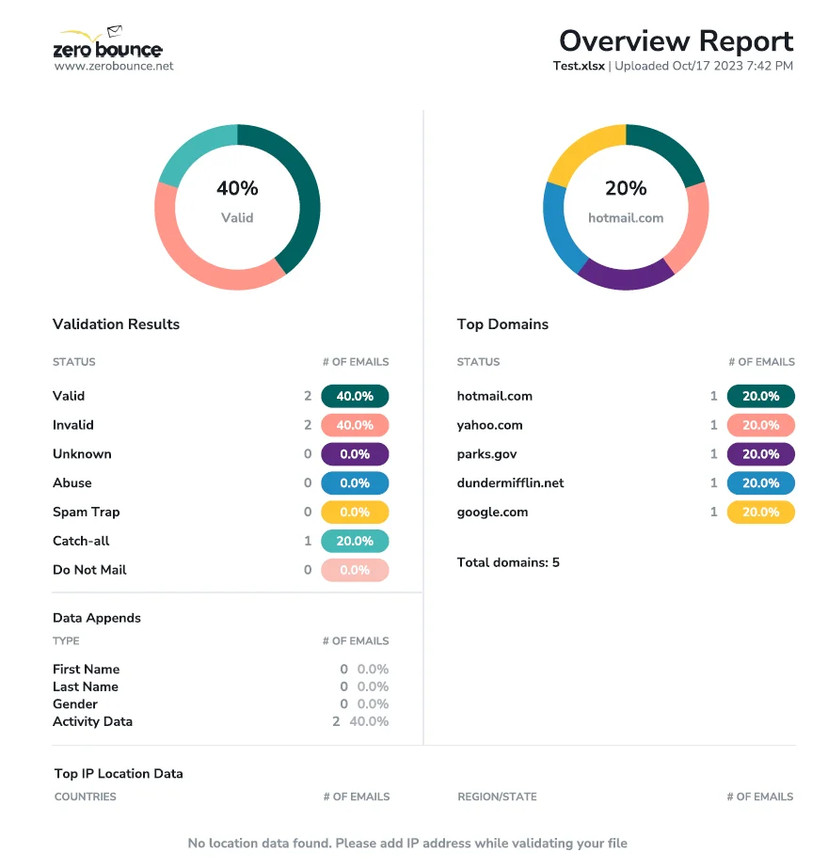
Similar to the report found in your ZeroBounce dashboard, the Overview report provides various visual representations of your email list cleaningⓘ results. The 'Validation Results' section shows each email status, the number of emails in that category, and the percentage of them across your whole list.
“Data Appends” once again shows added data, including names, gender, and Activity Data. The colored graph simply provides a different visual breakdown.
The ‘Top Domains’ section breaks down all of the email domains found on the list. It details the number of emails that fall into each domain, along with the percentage across the entire list.
Finally, the bottom section features geolocation data (if available), including the country or region where the email address originates from based on IP information.
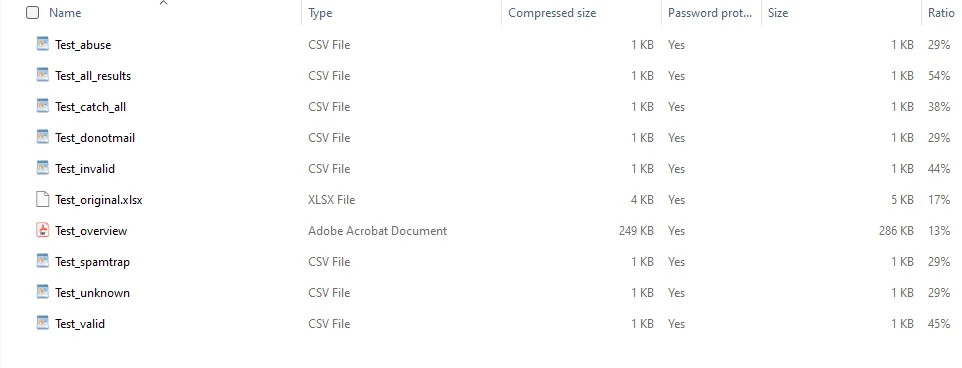
CSV files
The last results area to check is the CSV files within the results folder. Inside, you'll find one CSV that shows all results, along with additional CSV files that segment your emails by status.
If you need a refresher on the various email statuses, scroll back up to the earlier section in this section regarding your dashboard results.
Once you’ve familiarized yourself with your email verification results, you can use the CSV files as needed to replace your existing email list. It’s recommended to use your “Valid” file as it contains all of the email addresses that are safe for use.
However, you should also review the other email statuses to get a better idea of what was lurking on your email list. If you notice a high volume of risky emails from particular sources, you can use the data to start implementing safeguards for your future marketing campaigns, such as blacklisting or whitelisting certain email domains.
Final thoughts
After uploading your file for email verification, you'll be able to download the results for 30 days. Once the period expires, ZeroBounce automatically deletes all data. This security measure protects your account and email data from unnecessary risks. Be sure to download your results and store them in a safe place to avoid losing them.
ZeroBounce's email verification results all provide the same data, whether you're using the bulk upload tool, the single email verifier, or the email verification API.
Additional resources
Understanding the Executive Report
Related Articles
Generating HAR files in various browsers